
In order to get the most performance out of photoshop, you should check out the photoshop preferences. Let’s go ahead and explore the most important settings in the preferences window of photoshop. If you are in a hurry then scroll down and do the stuff that is in Black font in order to increase the performance of Photoshop.
Go ahead and open the preferences window. Windows users should go to Edit > Preferences > General or use the keystroke CTRL+K. Mac users should go to Photoshop > Preferences > General or CMD+K.
I am using Photoshop CS3 so if you are using a different version of photoshop then your preferences window will probably look different. But don’t worry, most of the settings will be the same though they may exist on different tabs so click around and explore on your own until you get to the settings that this tutorial talks about. If you are using Photoshop CS and above then you should be okay. Just feel your way around.
The following is not a complete tour of the Photoshop Preferences. I have only covered what I believe to be the most important settings for the average Photoshop User.
General Tab.
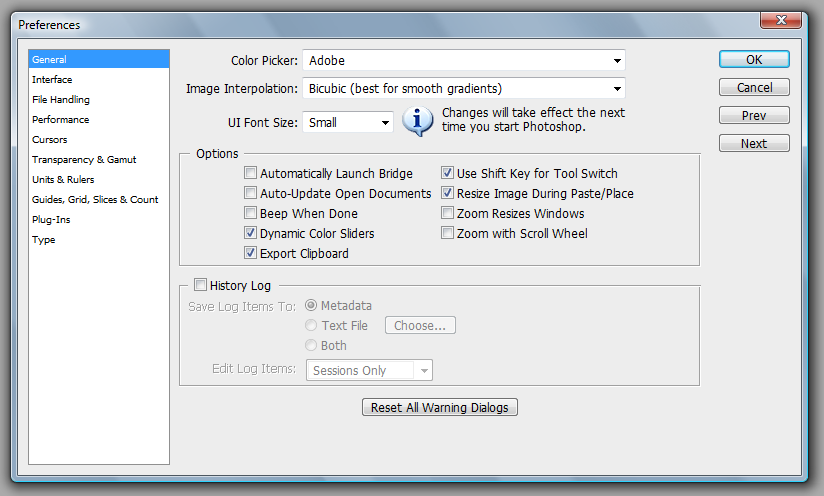
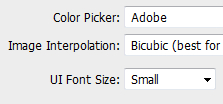 Color picker: This setting chooses between which algorithm should be used by the color picker. The options that I have are Windows or Adobe. I set this as Adobe.
Image Interpolation: This option is used to decide which algorithm photoshop uses when resizing an image.
- Nearest Neighbour makes the pixels larger or smaller. This usually makes jaggies more visible.
- Bilinear Interpolation determines the averages of pixels and then creates a new pixel based on the results. This produces almost no jaggies but makes the image blurry.
- Bicubic Interpolation is the default setting and should be a good setting for everyone. It creates sharp edges and not many jagged edges. Photoshop CS and above has two variants of Bicubic Interpolation, the Bicubic Smoother and Bicupid Sharper. Bicubic Smoother is optimum for enlarging images and Bicubic Sharper is optimum for reducing an image. None of these enlarge images very well. They will end up making your images blurry but that is where many current enlarging algorithms are currently. My advice would be to just keep Bicubic Interpolation. If you mainly do image size reductions then you can decide if you would like to set it to Bicubic Sharper.
 General Options: Most of these are entirely upto you.
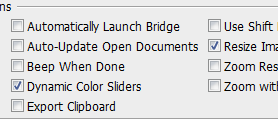
- Automatically Launch Bridge: Check this option only if you use Bridge to manage your images and photographs. If not then launching Bridge automatically will just slow down Photoshop’s start time.
- Auto Update Open Documents: If you use multiple image editing programs then turn this on. It is useful if you use Imageready or another image editor while using Photoshop. If not then never mind.
- Automatically Beep: This is useful if you are using massive images and single photoshop commands take many minutes to complete. Then you can just give the command and do something else and photoshop will beep to let you know that the command is complete
- Dymanic Color Sliders: I would recommend that you check this. When you move sliders, you’ll see the colors change in real time. Other wise they will only update once you change and release the mouse button.
- Export Clipboard: I would recommend that you UNcheck this. This will free up your clipboard and leave more memory free. Only check this option if you copy and paste items from inside photoshop to other programs.
- Use Shift Key For Tool Switch: This is entirely a personal preference. If you leave this CHECKED then you can press for example Shift L to select the lasso tool. While holding the shift button down you can press L agains and again to flip through all the other tools under the lasso tool (Polygonal Lasso and Magnetic Lasso). If you UNCHECK this then you just press L to select the lasso tool and then press L over and over to flip through the lasso tools. You’ll save a nano second if you uncheck this. I prefer unchecking it.
- Resize Image During Paste/Place. I would recommend that you check this. This allows you to free transform an image as soon as you Paste or place an image.
- Zoom resizes window. I leave this UNchecked. If checked then it resizes the window along with the image when zoomed.
- Zoom with scroll wheel. I leave this UNchecked. This is personal preference. I usually resize images with the slider on my Wacom Intuos 3.
History Log: This is useful if you want to save all the steps that you made while creating your images. It will tell you exactly what tool you used and applied which filter and what order you made the changes. This is very useful you are writing tutorials or just want to remember exactly how you made what you made.
- MetaData: This will save your history log in the image itself. This will make the image file size slightly bigger. This information can be viewed in the bridge or any other program capable of displayign image metadata (irfanview)
- Text File. Saves the log into an external text file.
- Both: Saves the log into both the image metadata as well as an external text file!
Interface Tab
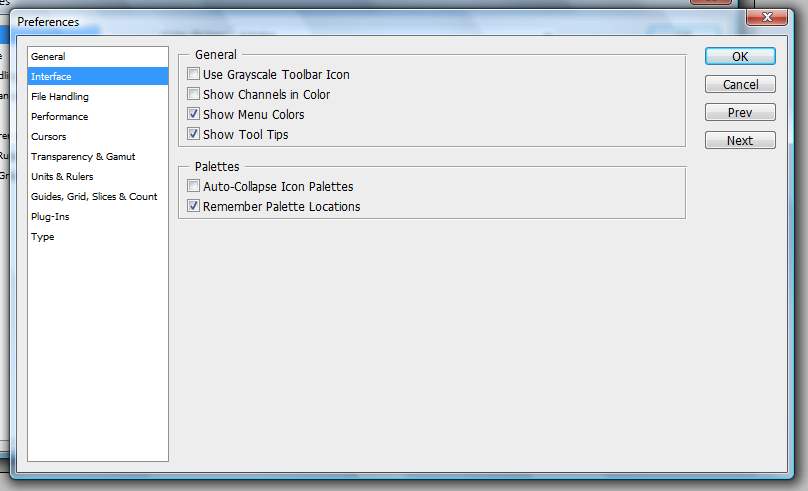
Use Grayscale Toolbar icon: This turns the “PS” above the tools from Blue to Gray. If the color is distracting to you then go ahead and check this.
Show Channels in Color: Check this if you want to show individual color channels in color. The default is unchecked.
Show Menu Colors: Check this if you want to show background colors in menus
Show Tool Tips: These are the tips that appear if you hover your mouse pointer over something. If you are a beginner or intermediate Photoshop user then leave this checked. If you find them getting in the way then go ahead and uncheck this.
Auto Collapse Icon Palettes: This will hide your palettes if you click anywhere else. This is useful if you feel that the palettes get in your way. I recommend that you Uncheck this. You’ll save a lot of clicks if you keep this unchecked.
Remember Palette Locations: I recommend that you leave this checked. It will allow you to better personalize photoshop according to your needs. If unchecked then all palette locations will get moved back to default between photoshop runs. This is a useful setting to have for shared computers such as in lab environments.
File Handling
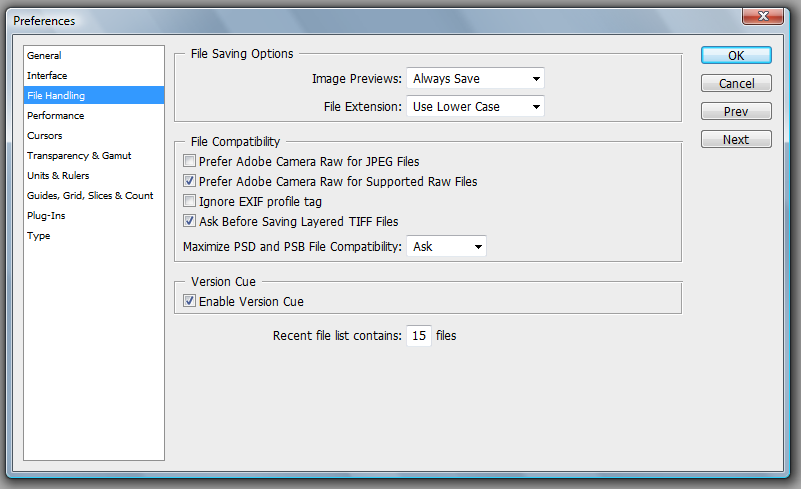
Image Previews: Saving an image preview will increase the file size slightly. This is the thumb nail that appears when you click on an image in File > Open. I recommend setting this to Always Save.
File Extension: I have this set to use lowercase. I am not sure why it would be important for anyone to use upper case. Please share in the comments if you know why saving in upper case would be important for someone other than just a personal preference.
Recent File List Contains: I have set this to 15. You can increase the number to 25. This is convenient if you open a lot of files and want easy access to them from File > Recent Files >
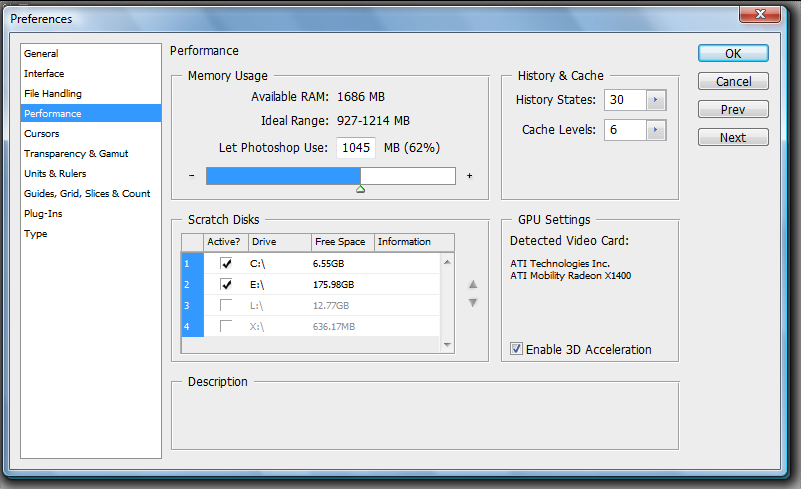
Performance
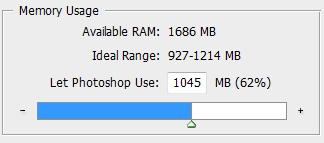
Memory Usage: If you have RAM to spare then increase this to 70%. This will greatly increase performance. This will reduce the performance of any other programs that you might you using. Your decision regarding this option greatly depends on how you use Photoshop. If you close all other programs and only work on Photoshop then increase this to 70% or 75%. If you use other programs while using Photoshop such as a web browser, Dreamweaver, or any resource hungry program then you’ll probably be better off setting this to 55% to 69%. You always want to give photoshop as much memory as you can for the best performance.
Scratch Disks: The best performance can be achieved if you have two internal hard disks in your computer. The second best performance can be achieved if you have one internal and one external harddisk connected by a fast connection such as USB2.0 or Firewire. The least would be to have one hard disk with free space. So if you have two internal physical harddisks in your computer then set the scratch disk to where photoshop is not installed. Example, If photoshop is on X:\ (or sda1) drive then make the scratch disk on Y:\ (sdb1) drive.
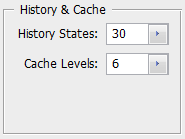 History States: Set this to 30. It’s always useful to go backwards in history incase you make an error. The larger number you set, the larger your files are going to be.
Cache Levels: The default Cache level in CS3 is 6. If you have CS or CS2 then change this from 4 to 6.
3D Acceleration: Always leave this checked. 🙂
I hope these tips will help you increase the performance of Photoshop. They certainly have made my Photoshop faster and more responsive. Please feel free to leave any comments below!