In this post I am going to write a basic overview of the Lasso Tools. After reading this article the readers will be familiar with the Lasso Tool, the Polygonal Lasso Tool, and the Magnetic Lasso Tool.
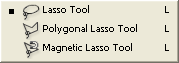
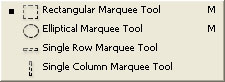
If you have just launched Photoshop for the first time your tool box will show you the Lasso Tool. To access the other Lasso Tools just click and hold down the Lasso Tool button and you will get a popup window giving you the option of choosing any one of the 3 Lasso Tools. This holds true for any tool on the photoshop toolbox that has a small black arrow on the bottom right corner of the button. The little arrow indicates that there are more tools available that are hidden underneath the tool that is currently shown.
Introduction
Just like the marquee tools the lasso tools are used to make selections. Selections are useful because they allow you to choose a portion of the image that you are working on. Once a portion is selected you will only be able to make changes to it and the rest of the image will remain unaffected.
The lasso tools give you much more control of what you are able to select than the marquee tools. However, both marquee tools and Lasso tools are equally as useful for different things. These are only tools and it is up to the user to determine which one will be more useful at any given situation.
General Rules
These general rules apply after you already have made a selection:
1. If you hold down the SHIFT key your Lasso tool will turn on the “Add to Selection” Option. Basically it does what the name says. If you have a previous selection then it will add what ever else you select to it.
2. If you press down the ALT key then your Lasso tool will turn o nthe “Subtract from Selection” option. Now what ever you select by clicking and dragging gets removed from your current selection.
3. If you press ALT+SHIFT at the same time and then click and drag over a selection then it will turn on the “Intersect Selection” Option. This means that it will keep only the areas that overlapped with your original selection.
4. If you press the CTRL key and then click and drag it will cut and move what ever you had already selected.
5. If you press CTRL+ALT and then click and drag it will Copy and Paste what ever you had already selected.
 The Lasso tool will all0w you to click and drag around an irregular shaped area. Everything that you click and drag around will get selected. To create a straight line with this tool just hold down the ALT key (mac users: option key) and then click and drag and now you will be restricted to only drawing straight lines. When you let go of the ALT/Option key you will resume drawing a free form selection.
 The Polygonal Lasso Tool allows you to create straight line edges. Choose this tool and then click at an edge of what ever you want to select. Next, let go of your mouse button and move the mouse to another corner of where ever you want to select. You’ll notice a line joining the point where you first clicked and your mouse pointer. Click where ever you want and it will create another corner. Finally click again on the starting point (a small circle will appear over your mouse pointer). This will close your selection. If you do not want to hunt for the starting point just double click anywhere on the image and your selection will automatically close.
This tool can create freehand edges as well. Hold down the Alt/Option keys and then click and drag and your edge will curve like the regular Lasso tool. Release ALT/Option key and you will resume drawing straight lines again.
 The Magnetic Lasso Tool is a handy tool for quickly selecting edges in an image. It detects the differences in colors and then guesses what you are trying to select. If you click once and then carefully move your mouse pointer over an area with contrasting colors then it will make a selection along the line where the colors differ the most. You can click the mouse button where ever you think is necessary to guide it along the way. If the colors are very different then it does a good job on its own.
You can use the Magnetic Lasso Option bar to set the Feather, Width, Edge Contrast, and Frequency.
The feather option definds how sharp your edges will be. If you enter a feather value it will blue around the edges.
The width is the distance from the edge that the Magnetic tool considers when it places a selection line. If you have a very high contrast image then user a large number here. If you have a low contrast image then use a narrow width. The smaller the width the more exact your selection.
If you have a high contrast image set the Edge contrast number high. If you have a low contrast image then set this number low.
This is the number of times the tool will create a fastening point on the edges. If you have irregular edges that you want to select then set this number high.
Lasso Tool Option Bar
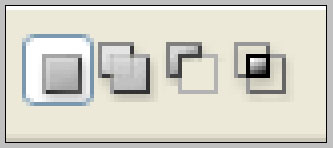
The right most button is the “New Selection” button. When this is pressed then our Lasso tools will select what ever you click and drag around.
The second button is the “Add to Selection” tool. This does what the name suggests. If you have selected an area of your picture and you want to extend that selection or select another part of the picture while keeping the first selection still active then you choose this button before making another selection. Instead of creating a new selection it will ADD to what ever is already selected.
The third one is just as useful and important as the second button. This is the “Subtract from Selection” tool. You guessed it, if you want to REMOVE a part of the selection then choose this button and then click and drag. What ever your selection now touches will be removed from what was initially selected.
The fourth button is “Intersect from Selection”. If you have a new selection and you chose the Intersect from selection tool then make a selection that over laps your first selection then only the areas that are overlapping will remain selected.
The Anti-Aliased check box should be selected if you want the edges of the selections to be smooth.
The Feather option blurs the edges of the selections making a soft edge as opposed to a sharp one.
That should be everything for Lasso tools. Comments and Questions are welcome 🙂
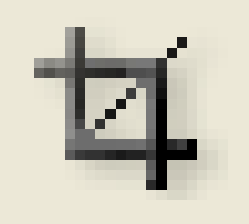 If you want to crop an image then you use the Crop Tool. Just click on it and then click and drag and it will make a selection. This is what will remain. You are selecting what ever you want to keep. The rest of the image darkens indicating that it will be removed. Then press the Enter/Return key and it will crop your image.
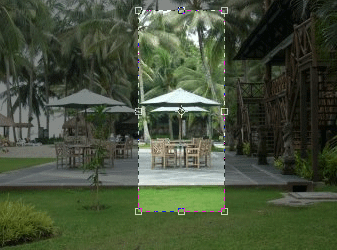
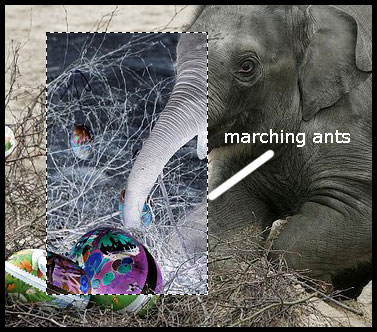 In this image I selected a rectangle in side the image using the rectangular marquee tool and then I went to Image > Adjustments > Invert. Notice that only the area inside the selection was affected. That demonstrates what the marquee tools are used for. It’s a very valuable tool that is used a lot by people who use Photoshop.
 The most useful options are probably the selection options. The right most button is the “New Selection” button. When this is pressed then our marquee tools will select what ever you click and drag around.
  The next option is the “Feather” option. The description of feathering from the Adobe manual is, “Blurs edges by building a transition boundary between the selection and its surrounding pixels. This blurring can cause some loss of detail at the edge of the selection.” Basically when you set a feather value in the selection options then you will not get an exact selection. All the previous examples would yield and exact outline of a circle or rectangle of straight line. When you set a feather value you will get a blurry edge. Here is a picture of the elephant selection with a feather value of 15. As you can see it inverted the colors out side the selection as well. The blurriness only happened over 15 pixels.
 I am going to start this blog by going over each tool available in the Photoshop Toolbox. This toolbox should already be open the first time your run Photoshop. If it is not available then click on Window in the menu bar and then click on Tools and it will pop up.