 Welcome back to PhotoshopTips.net. Have you ever wanted to easily adjust only part of an image with out any hassles? Maybe you wanted to have more control over the options in the Image > Adjustments menu. If that’s the case then you need to learn about Adjustment Layers. Luckily, that is what this tutorial is about.
We will go over what adjustment layers are and what they are used for. We will also briefly cover the many available options for adjustment layers, and then finally end with some examples where we will use what we are about to go over. For this tutorial I am going to assume that the readers already know some basics of Photoshop such as regular layers and the Image > Adjustments menu.
What is an Adjustment Layer?
We all know what a layer is (atleast I assume everyone reading this does 🙂 ). We can think of them as transparencies lying on top of each other. Imagine you take a transparency and you draw something on one and then place it on a stack. Next you take another transparency and draw something on it and then place it on the same stack. What is going to happen is that you will be able to see stuff from the first sheet as well as stuff drawn on the second sheet as long as they don’t overlap. That is what basic layers are.
Adjustment layers work in the same way in that you can see through them but they don’t change anything actually below them. So you can apply an adjustment (such as hue/saturation changes) on a transparency/layer and it will become an adjustment layer. Next you take this adjustment layer and place it on our stack of layers. Magically, when look through the adjustment layer everything seen through it seems to have that adjustment. However, it doesn’t actually change the layers below thus giving you a lot of control over what you do. You can change the adjustments later if you don’t like the effect as well.
Read on for detailed step by step tutorials
How to make and manage an Adjustment Layer
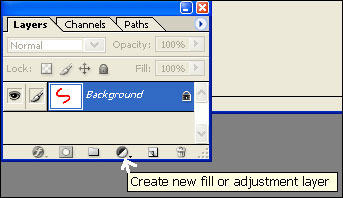
- 1. First select the regular layer on which you want the adjustment layer to be placed.
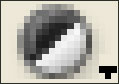
- 2. Next you can either click on the button in the Layers Palette that looks like a half black and half white circle.
- 3. Next choose what ever adjustment you want to apply
- 4. Then set up the appropriate settings for the adjustment you chose in step 3.
- 5. Click OK
Great. Now we have an adjustment layer. Notice that if you hide this layer by clicking on the eye next to it in the layers window you will be able to see the layers below which are unchanged.
Next you can adjust the settings you just in step 4 above by double clicking on the left rectangle in the adjustment layer. This will bring back the settings of your adjustment.
If you want to change the adjustment layer it self then click on the Adjustment Layer and then go to Layer > Change Layer Content and you can change the type of Adjustment Layer. Alternately you could just delete the adjustment layer and then recreate one but the former method saves you a few steps. 🙂
Next if you choose BLACK as your foreground color and then paint on your adjustment layer your adjustment layer will go away in the areas you paint on. If you choose WHITE as your foreground color then your adjustment layer comes back in the areas you paint on. If you choose a shade of gray then you will get a semi-transparent adjustment layer. The darker shade of gray you will choose the lighter the adjustment that you applied will appear. The lighter shade of gray you will choose the more obvious the adjustment that you applied will appear. You can not use any colors though. It only works with Black, White and shades of gray in between.
Finally just like regular layers you can also adjust this by playing with the blending options both in the Layers Palette on top (says Normal by default) or by going to Layer > Layer Style > Blending Options.
The Adjustment Options
There are 12 Adjustment Options available to you when you create an adjustment layer. I will go over them in more detail for beginners in later posts but I will give a general description now. They are:
- Solid Color
- Gradient
- Pattern
- Levels
- Curves
- Color Balance
- Brightness/Contrast
- Hue/Saturation
- Selective Color
- Channel Mixer
- Gradient Map
- Invert
- Threshold
- Posterize
This slaps a solid color on your stack of layers just like the name suggests.
This puts a gradient on your stack of layers
This allows you to choose a pattern and it applies it to your layer
This allows you to adjust the tones in your image. You can set the darkest tone and the lightest tone in your image and make the whole image change appear. You can make a dull image appear bright using Levels
You can use this to fix your highlights and shadows using this option
Adjust the colors of highlights, midtones and shadows separately using this option.
This lightens or darkens your image and increases or decreases the contrast.
This can be used to control the colors, the saturation and lightness or darkness of the image.
This allows you to add or remove percentage of a color present in your image. If you want your reds redder and your blues less bluer then this is what you use.
This allows you to adjust the reds, blues or greens. So you are adjusting each color channels itself
This adds gradients insides different colors of the image. Unlike the gradient tool, that put a solid gradient over everything, this puts colors in each color of the image.
This changes all the colors to what is opposite to them in the color wheel.
This changes stuff to black or white. The slider allows you to choose what tones it will be changing.
This reduces the number of colors used in the image.
Examples of using Adjustment Layers.
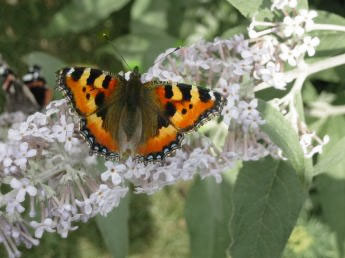
If only a certain part of your image is too saturated and the rest is alright and you want to desaturate only one area then using adjustment layers is a good idea. You will not risk messing up your original layer so you can tweak it to your hearts content.
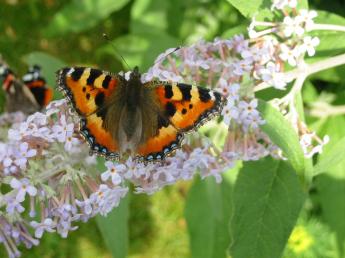
If we want to attract more attention towards the butterfly we may want to do it by desaturating everything else.
1. Open up the image in photoshop.
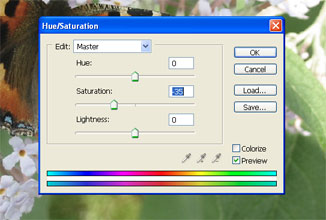
2. Next, click on the Adjustment Layer button in your layers palette and choose Hue/Saturation.
3. Change the Hue to -35. This will decrease the saturation of the colors on the whole image.
4. Grab the paint brush tool and change your color to BLACK and then paint over the butterfly. The butterfly’s color will return.
Here is a more detailed tutorial demonstrating adjustment layers. If you want to fix the tone/brightness on only one part of your image and fix the colors on one part of your image then you can use levels and hue/saturation adjustment layers.
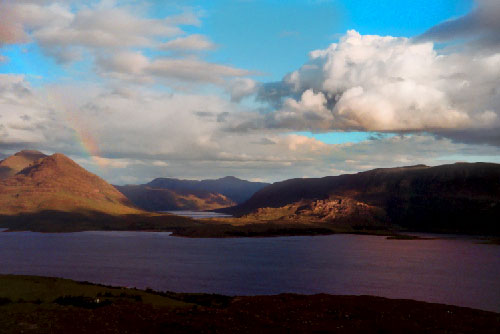
1. Open up your image. I want to make the hills darker but I want to leave the sky the way it is.
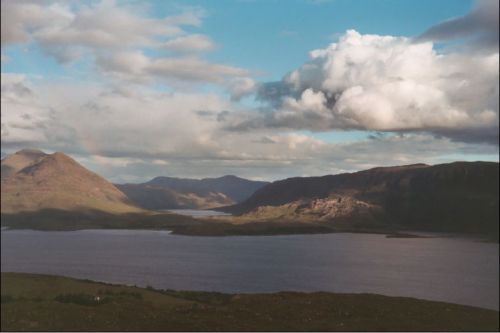
2. Apply the Layers Adjustment Layer. You will see the Layers dialog box show up. I clicked on the Set Black Point button and clicked on the darkest area. After a few more adjustments we have:
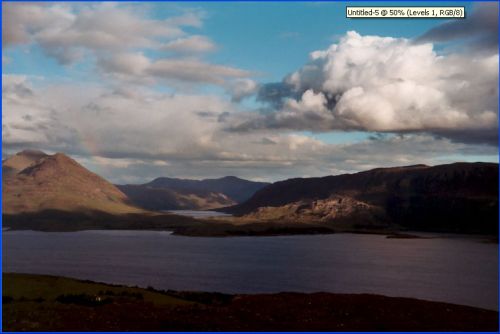
3. Next choose the paint brush and change the foreground color to BLACK. Then paint on the sky because we don’t want the adjustment layer to affect it. That gives us:
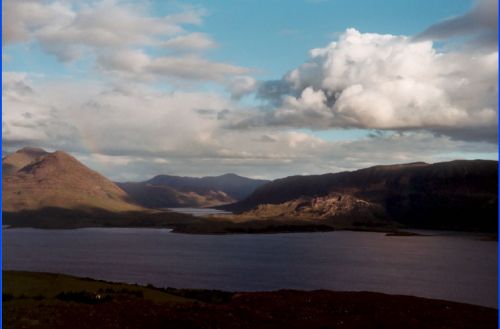
4. Now I want to enhance the colors. There is a hidden rainbow on the left and the hills could use better colors. So create a new adjustment layer above the levels adjustment layers. I increased the saturation until I got:
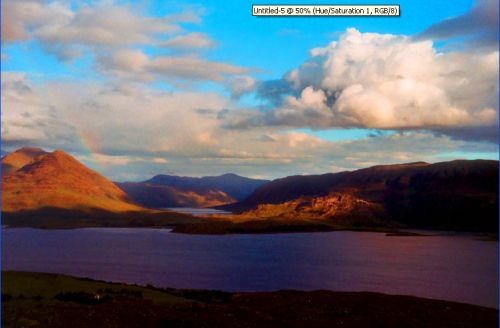
5. Since I don’t want the saturation increase everywhere I changed the foreground color to BLACK and painted everywhere I did not have the saturation increase. I let part of the mountains stay saturated and the rainbow saturated. The final result is:
nice in depth tutorial, im going to have to use this for some of my photos.
Hello tanz, Thank you very much 🙂
yea. Adjustment layers can very be useful and time saving. 🙂
thanks for visiting.
Learnin all the time.
tx
salam ali bud
I’m new to Photoshop and had some problem of getting to know about the Adjustment Layers and their applicability. Your this tutorial has immensely helped me to clear my confusion and now I’m confident about Adjustment Layers.
Thanks a lot.
This is real honey ! It has cleared lots of my confusions regarding Adjustment Layers. Give me nore on this. Thanks.
Pingback: Photoshop: Adjustment Layers. at Gargles
Good stuff, Tanz. I am new to the world of photoshop and this helped to clear up a few important things. (especially the whole black, white, grey thing with Adjustment layers) Thinking of them as transparencies immediately made it start to click for me…
BIg Up! Nuff Respek!
-Ghetto
Pingback: freetimefoto.com » Photoshop » Create Photoshop Custom Brush
Pingback: freetimefoto.com » Photoshop » Photoshop CS3: Clone Stamp Tool and New healing features
Pingback: freetimefoto.com » Brush » Create Photoshop Custom Brush
Pingback: freetimefoto.com : Tutorials » Convert Photo to Color Drawing with Photoshop
Pingback: Adjustment Layers Photoshop | Along-site
Pingback: Various stuff | James Likes Freedom
Pingback: Various stuff | The Open Source Ninja