Photoshop Tips and Tutorials
This is one of the most fun tools in Photoshop (CS+). This allows you to replace any color on a picture with out losing any detail. This is very easy to use so I’ll put up a quick demonstration here.
Today I’m going to try something new. I’m making a flash tutorial using Wink. Click More to view:
Please wait a few seconds. The flash tutorial takes a few minutes to load. Once loaded click on NEXT to play the movie
[FLASH]http://www.photoshoptips.net/flash/colorreplace/colorreplace.swf,441,432[/FLASH]
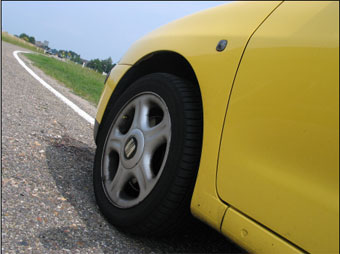
First I will choose an original image. This has a picture of a yellow car. To demonstrate the tool I’ll go ahead and change its color.

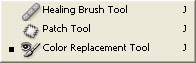
Next I’m going to click on the Color Replacement Tool. It is usually hidden beneath the Healing Brush Tool. If it is then just click and hold down the healing brush tool (or patch tool) and choose Color Replacement Tool from the list that pops up.

Next Choose a color. This will be the color that you want the car to be after you are done. Next I choose Mode: Color, Sampling: Continuous, Limits, Contiguous, Tolerance: 30% and Anti-Aliasing On. Next just paint over the surface that you want to replace colors of. Make sure that the plus sign or the cross hairs of the tool remain inside the area you want to change. If they go out of the surface then you will end up coloring the wrong thing. This is what I have now:

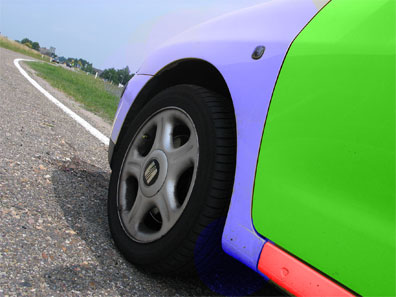
I got carried away and colored each part of the car a different color. Try it out and if you have questions or comments post them here
Mode: This determines the Painting Mode. Your choices are Hue, Color, Luminosity, and Saturation.
Sampling: This determines where you get your sample to replace from. If you choose continuous it will replace what ever you are dragging on. If you choose once it will only replacee the color you first clicked on. If you choose background swatch it will only change where ever the color is the same as your selected background color.
Limits: This determines where your color stops replacing. We choose contiguous meaning that it will not go beyond where the color is different.
Tolerance: This is how much shade difference of the color you are changing it will tolerate.
Anti-Aliasing: This allows you to get smooth edges.
Photoshop Tips is a blog community of Photoshop artists and designers. You will be able to find great original photoshop tutorials written in a very simple and helpful way in order to teach you photoshop for free!
Feel free to browse the site and leave comments and suggestions! ^__^
Request
September 18th, 2005 at 3:41 pm
Great tut dude, didn’t knew the tool at al..
I think masks are more preciser, but this is fun too.. nice!
Khurrum
September 18th, 2005 at 4:06 pm
Thanks
Thanks for the suggestion. I’ll be sure to write an overview/tutorial for masks next.
Altaf Rahman
September 26th, 2007 at 4:32 am
Realy useful for me thank you
Martin
January 21st, 2008 at 7:09 pm
Tried this on my home using the exact steps listed above. When I painted over the area I wanted to change, the color wasn’t the same as the foreground color I had picked. It was a different hue of that color. However, when I went back over this area using “Luminosity” as the setting the color changed to match the foreground color I had chosen.
I don’t want to have to (shouldn’t have to) paint an area twice to get the color that I want. What am I missing?
Any help would be appreciated.
Thanks,
Martin
Diane
March 7th, 2008 at 4:38 am
I have exactly the same problem as Martin!
todd
March 18th, 2008 at 9:55 pm
It seems we all have the same problems as Martin.
I tried replacing a white singlet to a dark red and got a light pink. I used then went over with the mode of ‘luminosity’ and yes it did work but i then lost all the detail of shading and fabric folds.
I then went over it with ‘saturation’ mode and got the perfect colour but no detail at all just a total colour replacement but lost all shading of the garment as well as the stitching detail etc gone.
Surely there must be an solution or a trick to using this correctly ?
NejiD
May 27th, 2008 at 3:00 pm
I’m having that same problem…I can’t seem to find an answer for it anywhere
CathL
June 20th, 2008 at 1:17 am
Same problem with the color. Seems that the selected color
comes out in a much lighter version, not all the color desired.
Khurrum, please let us know what we have done wrong.
Thanks.
meena
June 26th, 2008 at 7:23 pm
actually when im applying this to my image, using the exact steps above im facing a problem. when im ding this one the color was spreading to out of point also[full circle]. why?
mel
October 19th, 2008 at 1:12 am
I always wanted to know how to use the color replacement tool.y ou really helped me out.
Thanks!
indhu
November 15th, 2008 at 5:38 am
I have exactly the same problem as Martin.what is the solution for it?
xkickflip
November 17th, 2008 at 11:30 am
I had problems like everyone else did, hmm?
Also saw some confusion on other sites that had tuts for this tool. Using CS2 on Mac OS X and the Color Replacement tool is under the flyout for the BRUSH menu and not the HEALING BRUSH. Some people were confusing the redeye tool with it somehow. Just a heads up for users having trouble finding the tool on an older/mac version.
alex
December 16th, 2008 at 6:16 pm
could i use these same steps if i for example jus wanted to leave the car the way it was and make everything else black and white
christmas wallpaper cell phone
December 16th, 2008 at 9:56 pm
todoabigfavour
Zaque
January 15th, 2009 at 9:20 pm
I’m using CS4 and still having the same problem as Todd and can’t seem to find the answer anywhere …… anyone out there with a suggestion ?
Cricket
January 27th, 2009 at 11:03 am
Where have all the answers gone? Eagerly awaiting answers to the above.
Alexwebmaster
March 3rd, 2009 at 4:44 am
Hello webmaster
I would like to share with you a link to your site
write me here preonrelt@mail.ru
Adam
March 11th, 2009 at 4:13 am
I would also suggest using a soft brush and turning the spacing right down (particularly if your using hue)
John
May 24th, 2009 at 6:43 am
Hi, I cant find the color replacement tool, when I click on the links shown I can only see Brush/Pencil Tool & on the button below I have History/Art History Tool?
Any Help appreciated.
Diane
May 26th, 2009 at 11:47 am
Hi John,
Could it be to do with the version you are using? I know CS2 has it but I don’t know about earlier.
Motorcycle Helmets
June 11th, 2009 at 8:40 pm
nice.
Lolftw
November 16th, 2009 at 2:45 am
Uhm i used it and i got grey instead of black… What happened?
Adrienne
June 20th, 2010 at 12:39 am
Same as lolftw, I was trying to change white/gray to black, and instead got an odd shade of gray…
Oggie22
August 2nd, 2010 at 3:21 am
Thanks, this helped since I was trying to find this tool on Photoshop but I wasn’t sure if it existed or where to find it
Simran Preet Singh
September 13th, 2010 at 12:20 am
Hi,
I am also unable to find color replacement tool. Kindly help me to find.
Thanks
Katherine
December 28th, 2010 at 12:58 am
I too would love to know how to get the exact colour I picked onto an object to see what it will look like. No one has answered us yet. Please answer, I need colours from my front verandah. Thank you.
SwalerD
January 2nd, 2011 at 3:33 pm
Don’t know how many of you will actually get this reply but here goes;
Change the setting to luminosity to get the black you desire, I’m guessing you have it set to colour from the sound of your result.
1. The colour replacement tool in CS4 is the 3rd option in the BRUSH flyout.
2. The mode dropdown menu on the main toolbar has 4 settings. The first is HUE-this will change only the type of colour(e.g. red, green, orange, yellow, etc.)it will therefore only apply the colour you selected and it will inherit the saturation and luminosity values from the original colours you are changing from. The second is SATURATION- this will change only the AMOUNT of colour and not the colour itself, effectively just applying more or less of the colour you are changing and not the colour you have selected as you may expect as it will inherit the hue and luminance from the original colour. Third is COLOUR- this will change BOTH hue and saturation to the colour you have selected and inherit the luminosity from the original colour. Ideally this is the one you will generally be using as you don’t often want to change the luminance values if you are trying to keep the lightness or darkness of the image intact. The last setting, LUMINOSITY will take only the lightness values from your selected colour and leave the hue and sat values intact. You would generally only use this setting with a greyscale colour selected as luminosity is only measured in greyscale. As an example you could use this to brighten up a very dark red by selecting a light grey from your palette and using the luminosity setting on the object you wanted to brighten. It works with colours too but it’s harder to guage how bright/dark you will make the object.
Essentially the colour replace tool is a faster but less precise way of using adjustment layers and selections.
3. This one’s for Adrienne
‘Shoppy New Year all
Khurrum
January 9th, 2011 at 4:44 pm
Thank you SwalerD!
Martin @ mjc.design.works
May 26th, 2011 at 3:13 pm
Was hoping to use this tool to help a client visualize/choose wall/trim colors she selected from paint chip cards. My test photo included a section of wall, baseboard trim, ceiling and window trim. I cross referenced her color choices with my book of Pantone Solid Colors which I could exactly select from my CS3 color swatch table. For my test image, the foreground color l selected looked exactly like the desired color from my Pantone book, but when I used the Color Replacement Tool (mode = color) on the window trim, the trim ended up MUCH lighter than the foreground color. When I repainted using mode = luminosity, the trim did darken up, but I lost all the shadow detail and the trim went flat. Not good at all. Am I missing something? Hope so. But if this is how the tool is supposed to work, it’s completely useless – unless that is, you simply want to change to “some other color” and don’t need to be specific.
I see many other readers commented similarly above. Hopefully somebody will stumble across this thread and be able to shed some light on this topic.
Metal Roofing Ontario
June 15th, 2011 at 12:16 pm
Love the tutorial, just wanted to answer some questions.
To get an exact match you will need to use both color and luminosity.
Make sure to check your brush values (where you select different brushes) for
Hardness: how much pressure is applied to the stroke
Spacing: how for apart the “paint” or color is applied
Also check your tolerance value to allow for detail to come through as you are doing the color change, this setting along side the Hardness value really makes a difference if you are shading or completely painting over the original photo.
I usually set my tolerance value for colour to 100%, but back it way off to 3-5% when I switch to luminosity. With a balance of these settings I was able to get the desired effect I have been looking for.
« Kritter Kondo « Kritters That Twitter
December 30th, 2011 at 12:32 pm
[...] Kondo Deluxe and placing it in the project bin of Photoshop Elements. Switching Colors with Replace Color in Photoshop was then applied to change the pink to purple. Kitty Cat Madison (a Tuxedo by [...]