Halloween is coming up quickly and before we know it we’ll be trying to carve up some pumpkins. Everyone has seen the regular jackolantern design with the 2 triangles for eyes and the zig zag mouth. How about trying something different this year?
Using Photoshop you can easily and quickly create a stencil that you can use to carve up pumpkins.
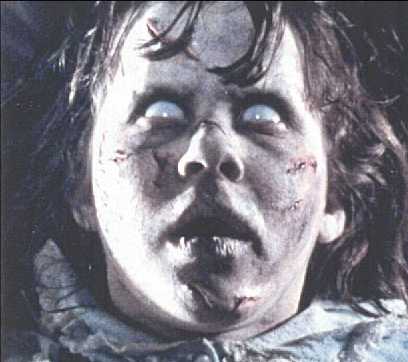
The first step is the most important. Find an image that has enough shadows and shapes so that we can carve a face with out having the pumpkin break up. For this tutorial I’m going to use a screen shot from The Exorcist. The picture can be disturbing for some people so be careful when you click on more:-
Okay. Step 1. I chose this picture:
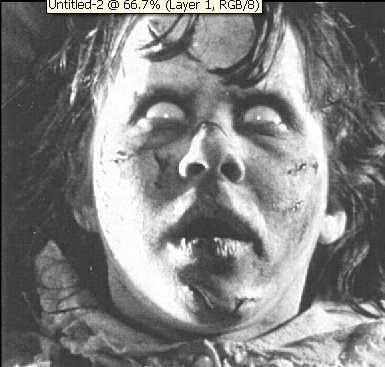
I chose this one because a) It’s scary. b) There are lots of well defined shapes in the image. For example there are well defined light areas and well defined shadow areas. Most of the shadows are joined together and that would make for a pretty stable pumpkin.
Step 2. De-saturate the image by going to Image > Adjustments > De-saturate and you will end up with something like:
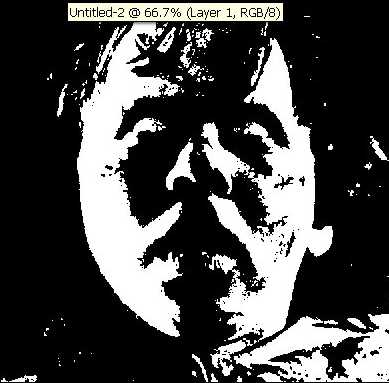
step 3. Go to Image > Adjustments > Brightness / Contrast. I did contrast 100% and brightness -60% and I got this:
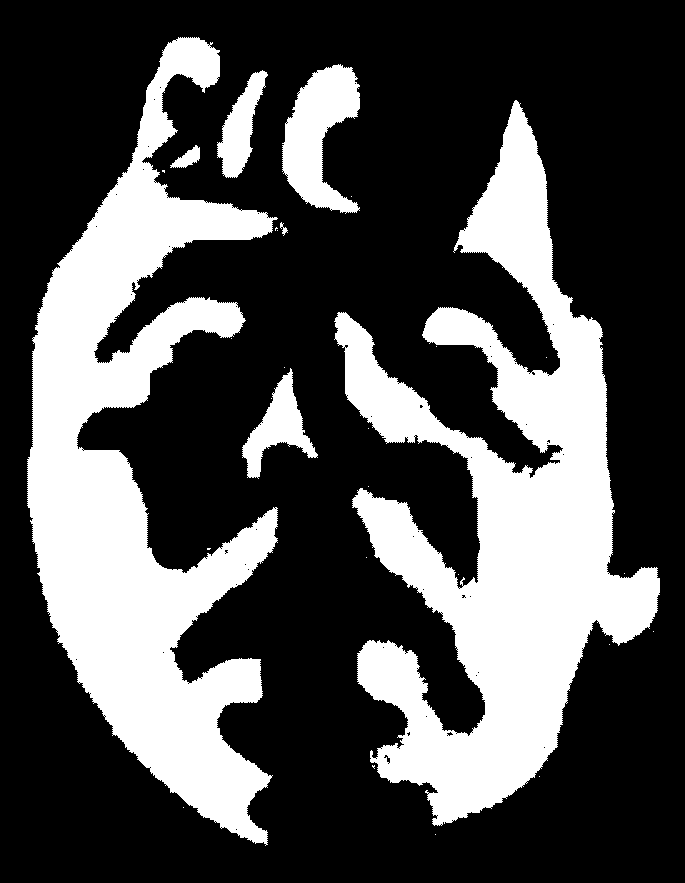
step 4. Next grab the pencil tool and use black for the foreground color. Make all the black areas so that they are easy to cut and are solid. Make sure that there are no floating black shapes because those would be impossible to cut. I got this:
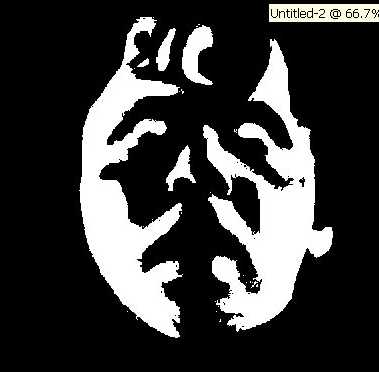
step 5. Crop and print. I cropped the image and printed out a large image. Big enough that it would fit a pumpkin. Now cut out the white areas and leave the black areas and you will have a very cool carved pumpkin! Here is a big one version of the image:
here is a good site to get inspiration: http://www.jack-o-patterns.com/Carvings2005.ivnu
here are some free cut outs made by members of somethingawful.com


We’re gonna carve pumpkins together, mate. I’ll grow them in my garden, you can help me dig the holes. 😉
That was scary maan… I’m going to do one or my arse.. that IS going to be scary! … can i post it here!?
zana: haha yes! totally! I’ll be right over 🙂
Solin: Yes you can post it here 😀 Email the pictures to me if you want and I will host them.
Pingback: Home Audio News » Halloween Pumkin Stencils
This is the most nasty pictures I’ve ever seen ya’ll are sick stupid heads.
Love, Olga Vitolas
Its stupid u should have more than that. like ghosts, cats, withches or what u cant do those now I cant do my pumkin a ghost because u dont have it.
hahahahahahahahahahahaha omg dat pic is such a crak up lol i cant stop laughin lmfao l8erz!!!
Pingback: » Not your average jack-o’-lanterns Photoshop Tips, Tutorials, News and Art
Olga : Thanks 😉
ljsdfhg : Sorry that you did not find what you were looking for. The purpose of this tutorial was to teach people how to create their own stencils so that you are not dependant on others.. you know.. i’m just teaching everyone how to fish 😉
3mm@: Thanks for stopping by 🙂
Wow.Creepy.Very creepy.Ghastly creepy.
Hello I just stubled over your page here. thanks for posting this its been a huge help to my halloween plans! Thanks again!!!
Kel
ok, do you have any stencils of Johnny Depp that I can have?
GAY
Pingback: Juice blogs » Blog Archive » Does it look like me?
this site was so scary i like pee peed on myself
are you friken crazy i like pooped my self lookn at that first picture!
this is how i went…………..
ahhhhhhhhhhhhhhhhh HOLEY MOLEY AHHHHHHHHHHHHHHH
That made me want to sleep with my nighty lighty every siungle night for the rest of my life
i cant figure out how to make a stencil out of my face.
yeah im scary lookin 😉
I CAN’T FIND ANY STENCILS, THAY ARE ALL REALLY STUPID! GRR!
This site is stupid, i can’t find any stencils that are worth while
i cant believe how gay this site is. NO GOOD STANCILS
This page doesn’t have many stencils because its purpose is to TEACH YOU how to make your own stencils.
fuck you all, im not sca and nor aree my eleven kids. damn niggers
fuck you all, im not scared and nor are my eleven kids. damn niggers
U CALL THIS STUFF SCARY?
U PEOPLE MAKE NO SENSE
you smell like a dead rat that i squished.
.:this stuff is stupid but funny:.
Scariest Picture Ever!!!!!!!!!!!!!! Rock on!!!!!!!!!!! Too Scarrrrrrrrryyyyyy!!!!!!!!!!!!!!!!
What a good looking girl!!! website is gay though. lol
hahahaha!!!! my dad is gay! and so is this website. the girl looks like my mom in the morning! ahahahahahahahah ha
you people have to much time in your hands. Fucking deadbeats. Nice site though .
omfg u guys are stupid these are not even scary and shit im 13 and im nto scared
i love this site
IT IS STUPID
That movie that that girl plays on is so freaken scary and its kindda Stupid to!!!!!
WTF?!?!?!?!?!?!?!?
So, let me get this straight..
Some losers surf the web to find ready-made stencils for carving pumpkins, but instead find one that clearly shows anyone (well,with more than 10 brain cells obviously) how to make your own unique and personalized pattern(s) for halloween and insted they talk smack about the web-site and its author…
I feel deeply sorry for you (losers)
Now, let me give thanks to someone who was actually willing to take the time to publish this site for OTHER people instead of just thinking of themselves like so many others in this day and age… your site was exactly what I was looking for to express my own individuality .
GOD BLESS
Whoah! I never thought it would look cartoon…. Great tips Sir! Thanks for sharing that… Keep posting great tips… 🙂
That movie that that girl plays on is so freaken scary
ugly girl u cant scare me
THAT is some Scary ass shit,dude
Pingback: pumpkin stencils
Pingback: scary pumpkin patterns
This specific blog post, “Halloween Pumpkin Stencils (warning: scary pictures) | Photoshop Tips” was very good.
I’m producing out a duplicate to present my personal close friends.
Regards,Gonzalo