 This tool is what you would want to use if your image has torn clothes, or stains, or holes in walls, or blemishes etc. This is very similar to the Healing Brush tool except with the patch tool you can define a selection where you want the effects applied.
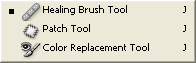
The Healing Brush Tool acted like a brush where as the Patch tool acts like one of the Lasso Tools. Once again the best way to learn how to use this tool is by using it! So go ahead and launch photoshop. You will find the patch tool hiding under the Healing Brush tool. Just click on the healing brush tool icon and hold your mouse button down until you see a new menu pop up. It will look like this:
Click on the Patch tool. Now we are ready to patch some stuff 😀
 Here we see Little Timmy. It seems like Little timmy got into a little accident. All his clothes are torn and his grandmother is coming over to see his latest pictures! We must do something noooww!! Ok stupid scenario but you get the idea.
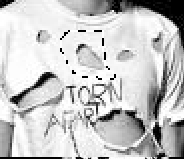 Choose the Patch Tool and then choose the Source button in the Patch Tool Option bar on top. Next click and drag around the place where the clothes are torn. Now we have told photoshop what area needs to be repaired.
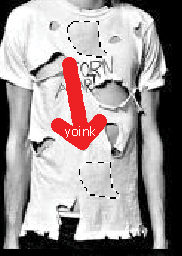 Next just click inside your Patch Selection and drag it over to where ever the shirt is not ripped. This is where we get the sample from. It seems like little timmys waist area was unharmed. Therefore, drag it there. You will notice that your original selection area changes to show whatever you are dragging on. Then once you get to the undamaged area release your mouse button.
As you can now see the torn area that we selected has now gone away.

With a little more work you can fix the whole shirt.

I only used the patch tool to fix the whole thing. In an actual photograph that I would need to fix I would have used all the tools available to me including the paint brush and clone tools. Since this was a patch tool guide I only used one tool. Much better results can be attained if you use all the appropriate tools. Thats the cool thing about photoshop… you have tons of useful tools at your disposal and you must mix and match them to optimum results.
If you choose destination instead of source in the Patch Tool Option bar you will be able to first choose the area you want to sample from and then drag to the area that you want to repair. It is personal preference and I think choosing Source makes more sense.
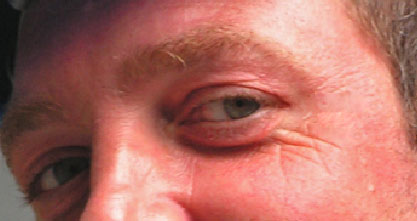
Here is another example. This time to remove wrinkles around this persons eye:
Step 1: Using the patch tool make a selection around some of his wrinkles

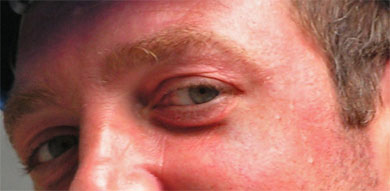
Step2: Click and drag the selection you made in step 1 to a place where there are no wrinkles
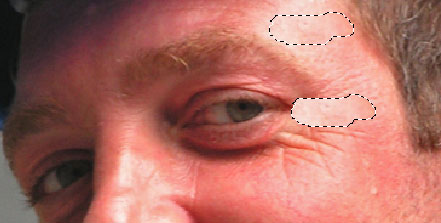
Step3: Let go of the mouse and you’ll see the wrinkles that you selected in step one have disappeared.
Step4: Repeat till all the wrinkles you wanted removed go away 🙂
that looks crap! u should have used a better pik for the tut cos that 1 really didnt work! poor doo!
Hello 🙂 . I’m sorry that you did not find that picture helpful for understanding how the patch tool works. I’ll create some more examples with different pictures soon.
Thats great..thanks so much, never knew about it.
Oh man it’s great! I am getting training (^.^) GREAT TRICK! MORE!
PS
Sorry about my english 😉
Jim: Thanks for visiting. Yes. it’s very useful. 😀
Qamcio Thank you 😀 Check back here often because we’re going to add lots more. Your english is good 🙂
Thanks for visiting everyone.
i like this tutorial. it is useful for that i will made with a picture! see ya! APelectronix
i have adobe 6.0
i dont have a healing or patch tool
T-T
is it possible for me to download one. do yu think
email me back if you can
Hi Carrie. 🙂
As far as I know Adobe does not provide a way to only download the healing or patch tools for Photoshop 🙁
I believe the reason for that may also be because Photoshop 6 uses a different brush engine than Photoshop 7.
You can either upgrade your version of Photoshop to the latest one by purchasing the upgrade which is around $160 on amazon.com right now.
Another thing you can do is to buy Photoshop 7.0 from Ebay ( there is one for $60 right now) but I thinking buying the upgrade to Photoshop CS2 would be the best value 🙂
Thank you very much for commenting 😀 It’s always great to read messages on here 🙂
You Rock!!
Just looked this up last night. I have the new Photoshop CS and even though I’ve worked with Photoshop for years, I have not needed to delve too far into it til now. This technique has saved and will save me SO MUCH time on my first MAJOR freelance job! Noticed the tool was not available in the 6.0 version today when I tried to show someone at work. Felt very blessed to have it at home.
The aspect that amazed me most was how the new selection changed to match the hue of the corrected area!! Just couldn’t believe this effect existed! Couldn’t have come at a better time!
Thanks for your help!! It’s SMOKIN’!!
Pingback: Shanna Bondesson
bwahahahha ambot ninyu…boang mo tanan!
thanks, and finally I know how to use this tool..Great job.
thanks, and finally I know how to use this tool(patch tool) ..Great job.
That’s great. Thanks. I’ve tried in vain to understand patch tool with various manuals, and you have explained it perfectly. Much appreciated.
Pingback: Photo Restoration - Photo restoration replace clothes pls help - Page 2 - RetouchPRO
Pingback: Photo Restoration - Photo restoration replace clothes pls help - Page 2 - RetouchPRO
Very usefull thanks! 🙂
AWESOMEEEEEEEEEE 😉