 This is one of the most fun tools in Photoshop (CS+). This allows you to replace any color on a picture with out losing any detail. This is very easy to use so I’ll put up a quick demonstration here.
Today I’m going to try something new. I’m making a flash tutorial using Wink. Click More to view:
Please wait a few seconds. The flash tutorial takes a few minutes to load. Once loaded click on NEXT to play the movie 🙂
[FLASH]http://www.photoshoptips.net/flash/colorreplace/colorreplace.swf,441,432[/FLASH]
First I will choose an original image. This has a picture of a yellow car. To demonstrate the tool I’ll go ahead and change its color.

Next I’m going to click on the Color Replacement Tool. It is usually hidden beneath the Healing Brush Tool. If it is then just click and hold down the healing brush tool (or patch tool) and choose Color Replacement Tool from the list that pops up.

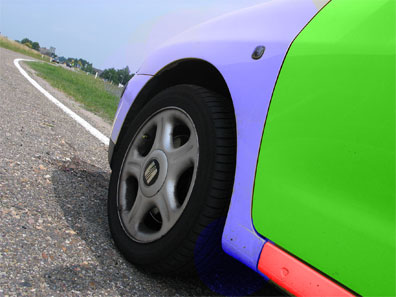
Next Choose a color. This will be the color that you want the car to be after you are done. Next I choose Mode: Color, Sampling: Continuous, Limits, Contiguous, Tolerance: 30% and Anti-Aliasing On. Next just paint over the surface that you want to replace colors of. Make sure that the plus sign or the cross hairs of the tool remain inside the area you want to change. If they go out of the surface then you will end up coloring the wrong thing. This is what I have now:

I got carried away and colored each part of the car a different color. Try it out and if you have questions or comments post them here 🙂
Mode: This determines the Painting Mode. Your choices are Hue, Color, Luminosity, and Saturation.
Sampling: This determines where you get your sample to replace from. If you choose continuous it will replace what ever you are dragging on. If you choose once it will only replacee the color you first clicked on. If you choose background swatch it will only change where ever the color is the same as your selected background color.
Limits: This determines where your color stops replacing. We choose contiguous meaning that it will not go beyond where the color is different.
Tolerance: This is how much shade difference of the color you are changing it will tolerate.
Anti-Aliasing: This allows you to get smooth edges.
Great tut dude, didn’t knew the tool at al..
I think masks are more preciser, but this is fun too.. nice!
GAY
Thanks 🙂
Thanks for the suggestion. I’ll be sure to write an overview/tutorial for masks next. 😀
Realy useful for me thank you
Tried this on my home using the exact steps listed above. When I painted over the area I wanted to change, the color wasn’t the same as the foreground color I had picked. It was a different hue of that color. However, when I went back over this area using “Luminosity” as the setting the color changed to match the foreground color I had chosen.
I don’t want to have to (shouldn’t have to) paint an area twice to get the color that I want. What am I missing?
Any help would be appreciated.
Thanks,
Martin
I have exactly the same problem as Martin!
It seems we all have the same problems as Martin.
I tried replacing a white singlet to a dark red and got a light pink. I used then went over with the mode of ‘luminosity’ and yes it did work but i then lost all the detail of shading and fabric folds.
I then went over it with ‘saturation’ mode and got the perfect colour but no detail at all just a total colour replacement but lost all shading of the garment as well as the stitching detail etc gone.
Surely there must be an solution or a trick to using this correctly ?
I’m having that same problem…I can’t seem to find an answer for it anywhere 🙁
thankssssssssssssss…………..