Photoshop Sharpening Tutorial – Part 1
The goal of this tutorial series is to provide the reader will all the information I have about sharpening photographs in Photoshop.
What is Sharpening exactly?
All digital photographs lose a certain amount of sharpness. That means that most photographs will look a bit blurred and their details won’t be as prominent. Basically, sharpening makes the edges of a photographed object appear more distinct.
Why do we need to sharpen?
When a digital photograph is taken the camera converts all the visual data that it receives into lots of 1s and 0s. Basically, what that means is that the camera doesn’t really know what it’s actually “seeing”. It takes all the data available to it and just dumps all the information on to disk with out differentiating between the important stuff and the not so important stuff. For example, if you take a picture of a fly sitting on white marble, the camera will pay as much attention to the white marble as it does to the object of the photograph, the fly.
Sharpening is a way in which the photographer says “hey… this fly needs to have more emphasis and show more detail than the white marble!” The photographer then does some mumbo jumbo until the level of detail and emphasis that he wants on the subject is reached.
What is this mumbo jumbo you speak of?
This is what the remainder of this tutorial will focus on. How does one effectively sharpen an image with out completely ruining it? I will attempt to give you, at least, an over view of all the sharpening tools available to a Photoshop user. I will probably pay more attention to the more important tools.
You might be wondering something along the lines of: “well… there is a sharpen tool and I click on it and I drag it around and it sharpens… what’s so complicated about that?” The answer to that is that there needs to be a fine balance when you sharpen because it’s very easy to kill your images. You might end up sharpening the noise in the photograph and hence end up emphasizing the wrong stuff. So, just bear with me and I’ll try to make this as easy and quick as possible 😀
What does sharpening do exactly?
Ok, now for some technical stuff (well… not really). When the human eye looks at an object it will be looking for edges. Sharpening defines those edges better. Here is an example (click on the images to enlarge them):
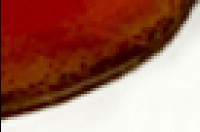
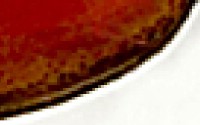
If we zoom in and view the edges of this lady bug we see the following:
After sharpening you will see that all the edges have a halo around them with the color of either side:
Notice the white around the edge of the lady bug. And notice the blackish red on the inside of the edge. That is what sharpening does… it creates a halo around high contrast area to emphasize edges. Before and after:
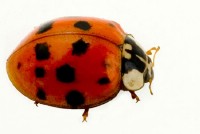
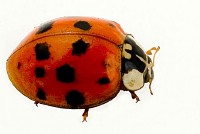
The edges are all sharp.
The Sharpening Tools
The most obvious sharpening tool is called, umm… the sharpen tool. You can find it on the Tools window and is sometimes hidden behind the smudge or blur tool. It looks like:
This tool increases the contrast between the pixels where ever you click and drag. The only options that you have for this tool are brush selection, strength and blending mode.
The blending mode options are:
Normal – This sharpens what ever you drag your mouse over
Darken – This sharpens pixels darker than your foreground color
Lighten – This sharpens pixels lighter than your foreground color
Hue – Causes complementary colors to appear
Color – Same as Hue
Saturation – This increases the saturation
Luminosity – This increases the Luminosity
This tool is handy after you’ve already done all the other sharpening work and need some extra touch ups here and there.
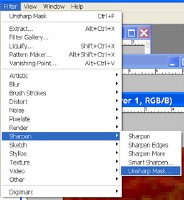
The rest of the sharpening tools are in the Filter menu:
Unsharp Mask
Unsharp Mask is the heavy weight of all the sharpening tools. This guy offers you a lot of power and control over the sharpening process.
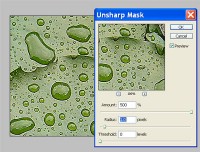
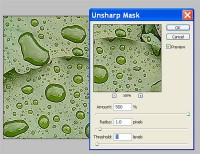
The amount changes the amount of contrast between pixels. The more the amount the more you will notice a change in the picture. If you set this too high then the halos around edges will be too noticeable and the picture will look terrible. The amount that you need is determined by the subject matter and the resolution of the image. If the subject matter contains something like trees or people then I’ve noticed that a lower amount is fine. For buildings and objects with sharp edges, a higher amount works. For high resolution images you’ll need to increase the amount more. You’ll need to experiment with it.
The Radius is the size of the halo around the edges. One side of the edge will have a lighter color and the other side of the edge will have a darker color. The number that you are changing is the number of pixels surrounding the high contrasting areas. High resolution images will need a higher radius. Low resolution images will need a lower radius. Also I’ve noticed that the radius and amount can be inversely proportional, meaning that higher radius can have a lower amount and a lower amount can have a higher radius. Once again, you’ll have to experiment.
Finally, the Threshold determines what exactly you want an edge to be. Photoshop thinks that colors that are touching and are very different from each other are edges. If your threshold is set to 0 then everything will get sharpened (including noise). This option allows you to choose what should get sharpened. A threshold of over zero will only sharpen areas with high contrast and won’t touch areas with low contrast. This is helpful because you don’t want stuff like noise getting sharpened along with real edges. The higher the setting the less areas the sharpening will be applied to.
Let’s sharpen an image using the unsharp mask filter!
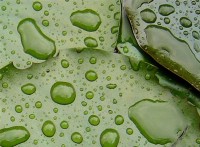
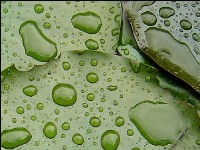
First lets choose an image:
When I sharpen I like to sharpen everything as much as possible and then decrease the effect till it looks just right.
So, first decrease the threshold to zero so that everything in the image is sharpened. Increase the radius and amount to its maximum setting. Everything will look terrible.
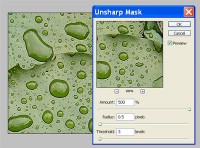
Next decrease the radius to about 1.0px
Now you will see stuff that will have grain and noise. Increase the threshold so that the noise does not get sharpened. Use your best judgement and increase the threshold to the lowest setting possible where everything looks smooth.
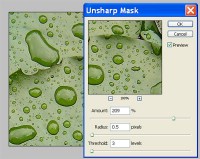
Now adjust the radius so that everything looks sharp but still natural. You’ll have to use your best judgement.
Now finally decrease the amount until everything looks natural.
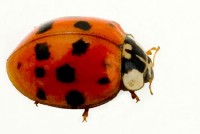
The final version of the image:
This ends the first part of a multiseries sharpening tutorial. In the next tutorials I will cover the new Smart Sharpen filter in CS2. I will also share with you other techniques with which you can sharpen your images. See you next time.
Please leave comments. 🙂

Pingback: Smart Sharpen at Photoshop Tips
Nicely explained – looking foward to Part2
I like your tut’s, they are well explained and easy to understand, even for a total newb like me, thx!
very well explained and easy to follow. i like your tutorials very much.
This is awesome tutorials I’d ever seen. Now I understand what it is ‘sharpening’. Thanks to you!!!
Your tutorial is clear and thorough… thank you for sharing this very helpful information.
Pingback: Sharpen Digital Images
Great tutorial. Explanations are in laymen terms and easily understandable for the beginner.
Thanks for sharing.
I´m trying to find some help on “smart sharpening” which is not the feature in new photoshop, but a tecnique for sharpening with the help of filters: find edges , noise/median, other/maximum, gaussian blur and unsharp mask. It´s supposed to sharpen the edges but leave noise in the background. It looks fine on the screen but when I print the picture it only prints the mask. What am I doing wrong? Anyone?
Pingback: smart tecnique
Pingback: photoshop sharpening low res images
Do you have a spam issue on this blog; I also am a blogger, and
I was wanting to know your situation; many of us have developed some nice practices and we are looking
to exchange strategies with other folks, why not shoot me
an e-mail if interested.
Hi there, every time i used to check webpage posts here in the early hours
in the break of day, as i enjoy to learn more and more.
Excellent blog here! Additionally your website a lot up very fast!
What host are you using? Can I am getting your associate link on your host?
I want my site loaded up as fast as yours lol
Thanks for sharing your thoughts on CA. Regards
My blog Marcy
These diamond rings are termed as antique because of the fact that these rings involve intricate and complex designs that are quite common in antique
jewelries. The rule of thumbs is; the clearer the diamond the more costly it will be.
Cubic zirconia are extremely beautiful stones and they are inexpensive when compared to diamonds.
Stop by my site … engagement rings hatton garden
I was recommended this website through my cousin.
I’m no longer sure whether this post is written by way of him as nobody else realize such specified approximately my problem. You’re incredible!
Thank you!
Everything is very open with a clear description of the challenges.
It was definitely informative. Your website is useful. Thanks for sharing!