This tutorial is for people who are just starting out Photoshop or for the people who have been using Photoshop but don’t know how to use Layer Masks.
The basics of Layer masks are incredibly simple but very powerful.
As always we’ll go over a simple tutorial that will quickly teach you how to use Layer Mask Basics. I think that actually doing something is the best way to learn. At least doing some thing is much, much better than just reading about it 😀
First, a tiny intro:
What happens when someone wears a mask?
Dumb Question, yeah? It’s obvious that everything behind the mask is not visible and everything else is visible. That’s basically how Layer masks work except that you choose where the mask is and how opaque it is. Simple huh? So let’s follow a quick tutorial.
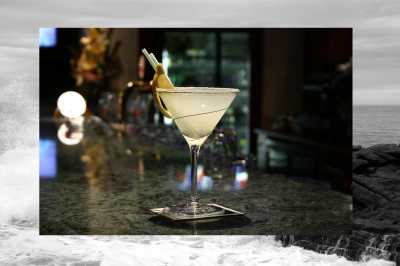
The Final Result of the tutorial is:

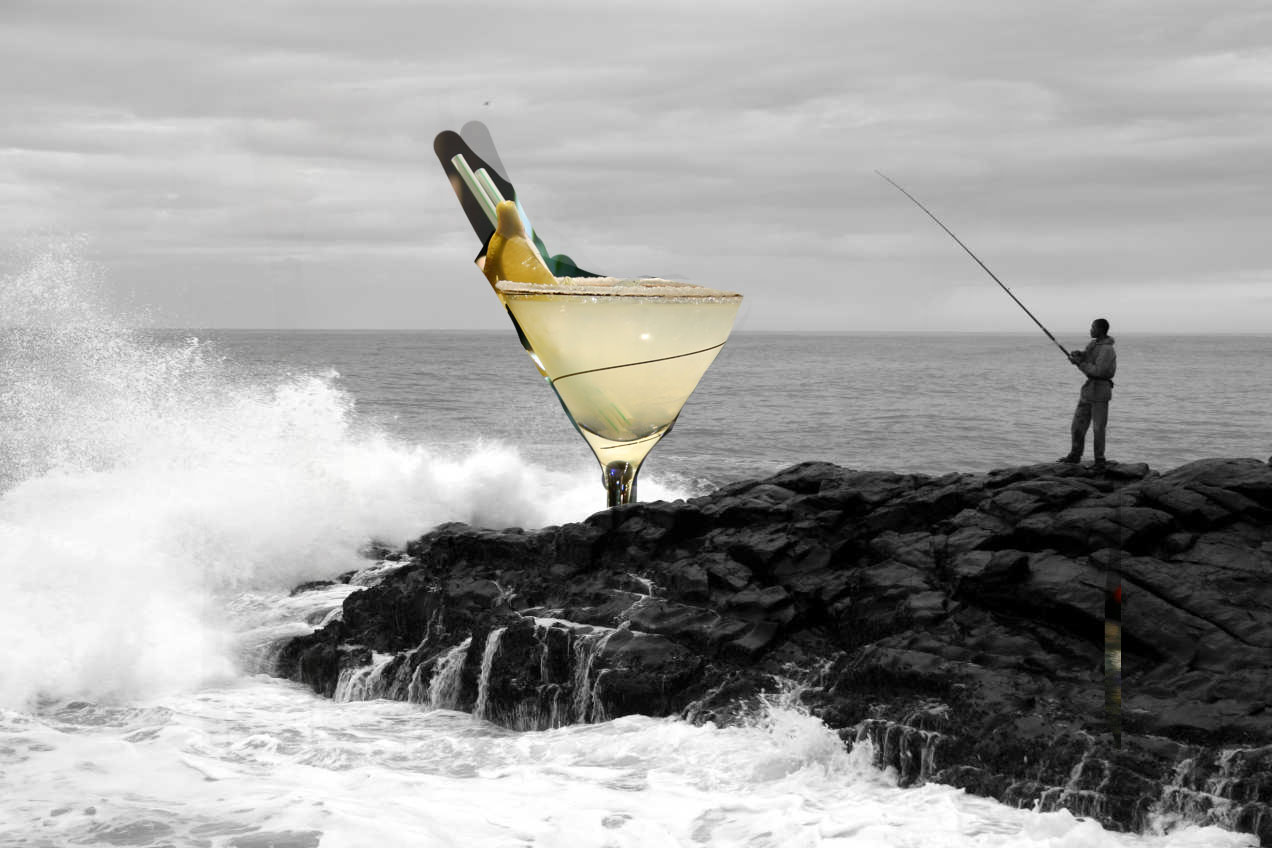
Yeah, so it’s a glass that is behind some rocks but in front of the ocean. Notice that the glass is partially transparent and you can see the ocean from inside it but the straw, slice of lemon and the stem of the glass are opaque. And yeah… I know the image isn’t going to win any awards but it’s great for explaining Layer masks 😀
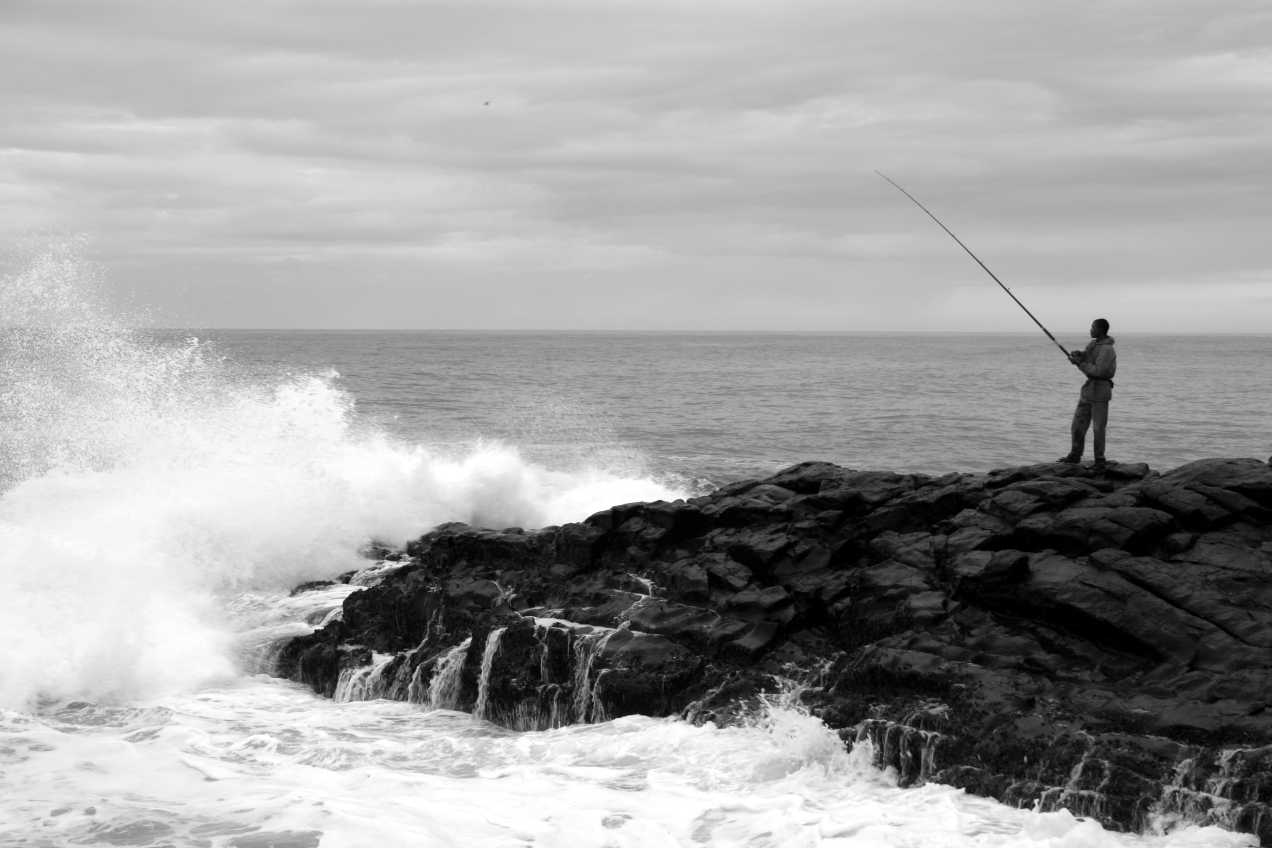
Step 1: Find two images that you want to combine. Here are the images I used:

Step 2: Open both the images in Photoshop. Then, choose the Arrow / Move Tool. Click on the glass image and drag it over to the image with the guy fishing. You can resize the glass so that it’s not too big or you can leave it the way it is. Your choice. Click here for a short flash video of this step if you are having trouble moving the glass image on top of the ocean image.
Step 3: Choose the layer with the glass and then click on the Layer Mask button. It’s the rectangle with the circle in it.
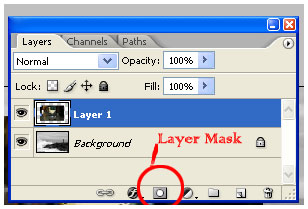
After clicking you’ll see something like this:
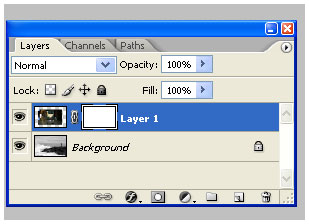
There it is! The layer mask. Currently it is set to reveal all of the image, meaning that the mask is off and nothing is hidden (since it is revealing everything!)
Now we actually use the mask. First let’s think of what we’re trying to do.
- We want just the glass visible so we need to get rid of the background of the glass image.
- We also don’t want all of the stem of the glass visible because we want to give the illusion that the glass is sitting behind the rocks.
- We also want part of the top of the glass transparent because we want the viewer to see through it.
If we used just layers and opacity of layers to accomplish this then we’d end up cutting up glass in lots of portions and messing with the opacity and it would be tedious and really, really annoying and would take a long time. That is why we’ll use the layer mask!
Hmm, you’ll also notice that when you click on the layer mask your colors in the color picker turn to black and white. So here it is… the secret of Layer masks: Depending on what the settings are, the color WHITE shows or reveals the image AND the color BLACK hides or masks the image (We’re talking about the image on which the layer mask is applied, not the layer below it). So on to step 4…
Step 4: Grab your PAINTBRUSH. Choose BLACK and start wildly painting. Paint over the stem so it looks like the rocks are infront. Paint over the background of the glass image. Keep on painting until you only have the glass. Now what if you make a mistake and hide part of the glass? No problem. Layer masks are not destructive so just change the color to WHITE and paint over the glass and it’ll magically reappear. You can basically adjust the brush size, or the shade of
gray and you get way more control than using destructive methods. If you use an eraser you can’t easily undo something you did 20 steps before etc etc.
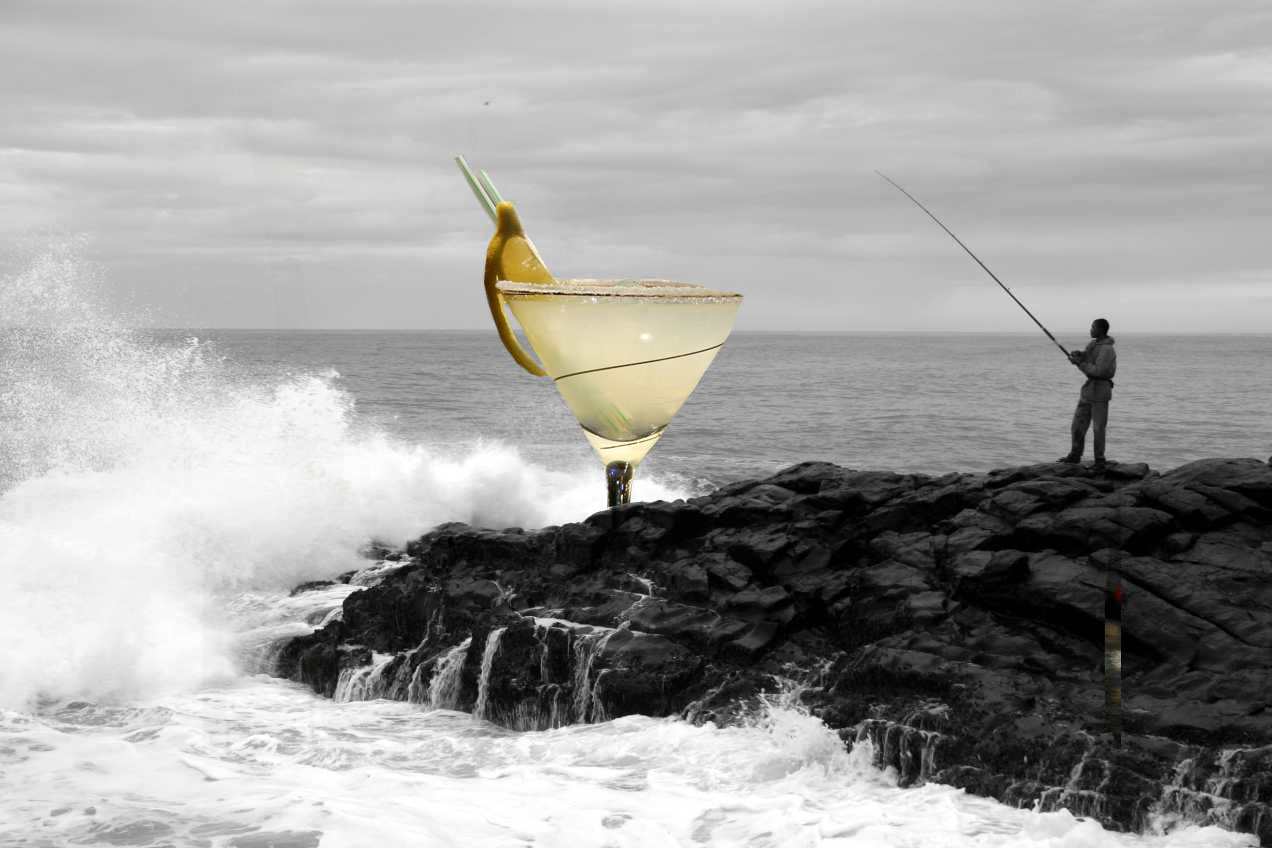
So here is my version of this step:
I’m not worried about being perfect because nothing is being deleted. It’s all there. Just hit the “X” key on your keyboard and you’ll quickly switch between black and white and you can fix your mistakes. Now after you have quickly erased everything that is not needed just zoom waaay in and with a small brush just fix up the edges so they look good. Be sure to get that area in between that lemon slice 😀 .
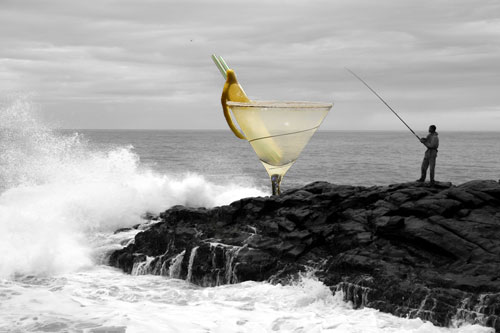
So now I have something like this:
Step 5: Finally, we need to make the glass a bit transparent. You can do two things. You can a) Set the opacity of the brush to 50% and then paint right over the glass or b) You can change the color of your brush to gray and then paint over the areas you want to make transparent. Using the current settings (i.e White reveals) then if you make your brush dark gray then your glass will be less opaque and more transparent. If you choose light gray then your glass will appear less transparent. Just
paint it gray in the areas where you want it to appear slightly transparent but not in the areas with the lemon slice and straws. If you can’t make the transparent area look smooth (ie. you can see the brush strokes) then just grab the smudge tool and lightly smudge the gray area until it looks good and smooth. You can use any filter or tool on the layer mask and it’ll give you a new sort of effect :D.
That is all. You have the final image:
I hope I was able to show you how layer masks can make your life easier. This is obviously not the only thing you can do with layer masks so keep playing with this and learn more. If you have any questions then leave me comments below and I’ll try my best to get back to you in a timely fashion.
Notes:
- Layer Masks are one of the easiest features of Photoshop to understand. A Layer mask is just what it sounds like: a mask that goes on a layer. Think of what happens when a person wears a mask. You can see through the holes but not through the mask itself. It’s a great way to non-destructively hide parts of a layer. You will not lose any data and to go back to the original state you’ll just delete the mask.
- You can go to Layer > Layer Masks > Reveal All or Hide All to apply the mask (also you can just choose the rectangle with the circle from the Layers window.)
- Use the “X” key to quickly switch between Black and White (to show and hide)
- Shades of Gray in a layer mask change the opacity of the layer.
- A link icon appears in the middle of the layer and the layer mask. If it is linked then both the mask and layer can be moved together. If it is unlinked then you can independently move the layer and its mask.
- Be sure to click the Layer mask rectangle in the layer window when working with layer masks.
- Commonly, layer masks are used with Text and Gradients so experiment with those.
- I’ll continue updating this page with more tutorials and examples if I can think of any 😀
- Comments, Critiques and suggestions are always welcome.
TY vry much 😀
Thanks, it worked for me.
i really want to know how to edit such pictures through adobe photoshop
well, it help me a lot!!!
hey im trying to do this but mine keeps saying my layer is locked or something how do i change that so i can move the picture on to the other one please write back i really want to get to no how to use photoshop
pl4yboyb1tch@hotmail.com
Thanks every one 🙂
Amy > If it says that it is locked try to double click on the background layer and then click ok. The layer name will change from “Background” to “Layer 1” and then you’ll be able to click and drag it over to the second image 🙂 Please let me know if that does not work.
Hi!!
I am trying to implement this tutorial but i dont’t know i can not import second image in new layer. How to import two diffrent image in two diffrent layers? I am a biginner.
Thanks,
Hello Krupa 🙂
What version of Photoshop are you using? I created a short flash video for you on how I imported the second image into a new layer in Photoshop CS2. You can view the video by clicking here:
How to import the second image in a new layer
I hope that helps. Please let me know if that does not solve the problem 🙂
It’s realy cool & easy.I think I got what you tried to teach.
Thank you very much for your hard work.
Keep it up.
It worked the firts time i did it really well, but now i couuple of days on its not. It’ll maks a layer, but not unmask it… i must of changed some setting, how can i reset it?
I have always been afraid of asking anyone about the layer mask tecnik and you have made it so easy and fun to do, a big THANK YOU …. I got it. There are alot of me’s out here and only a few you’s…so keep pumping out the basic stuff. It is appreciated..lwilliam7
Thanks very much, great tutorial. I learnt alot.
keep ’em coming…
Hi Garg!!
Thank you very much. I tried this tutorial using your video help and now its working good.
Thanks.
hey buddy!!!!!!!
u made it very clear man……grt teaching….
keep it up……do write more tutorials,,,or even a book on photo shop
thanx
really i leared clearly about layer mask. the photo created was really superb.
Thank you everyone 🙂
I am writing more tutorials. I’ll post them soon 🙂
Also please feel free to suggest what tutorials you’d like to see. The most difficult thing for me is to decide what to write next 🙂
Really easy and helpful tutorial! I tend to do most ‘effects’ by hand and this will be fun to work with. Keep ’em comming. 🙂
it do’nt work. I got the same problem like amy.
Super! Thanks for providing such a much-needed service. So appreciated.
Thank you! Dude, I just got ImageReady, simply hours before I found this… You wouldn’t believe how lost I was…
Thank you for giving me an example of the wonders ImageReady has to offer
hey… that was great tuturial…i learned a lot… thanks…what about applying text.. say if we use pictures and add text as if it is the person that is talking… like cartoon… yes… cartoon figures with messages… would appreciate it very much..
Garg, Excellent tutorial for us beginners. Thank you for the easy analogies too, since PS is so complicated that we tend to get overloaded with the “less-than-simple” names of a few tools. Please keep them coming in your easy-to-learn style, i.e. using the “Unsharp Mask”. Thanks again!
I am a beginner and this has helped me out a bunch. Really appreciate you taking the time to explain to us newbies.
Thanks so much, I have played with Photoshop to no end but this part escaped me until I read this, all of a sudden t clicked! I had absolutely no problems once I tried your project.
Thanks that was very helpful and it worked
Thank you all 🙂
THANKS…gud tut…it helped me alot..
4..[url=http://hometown.aol.com/xyi555/christmas]christmas[/url][url=http://hometown.aol.com/xyi555/test]test[/url][url=http://hometown.aol.com/xyi555/walmart]walmart[/url]
I just started working with Photoshop less than a week ago and I have to say this is an excellent tutorial. Thanks!
Awesome tutorial. Thanks very much.
and what about the vector masks?????? and what is really a vector and where it helps????
i’m lost..photoshop is really really b i g!!
supppppppppeeeeeeeerrrr tutorial….really helped me…thanks a ton…
Hi, Sure hope that you can help me. I just started using Photo Shop Cs2. I found your tutorial for layer masks. I can get to step 4, but can not get the paint brush to do anything. What I am doing wrong! Would appreciate any HELP!
Thank You.
Katie > Make sure that in the Layers Palette you have the proper layer mask selected. Click on the Mask and then paint on it 🙂
Great tutorial. Having trouble getting black as a paint in my brush. I have photoshop 7 and the color comes in light red. Then when I move the picture over all I get is the painted area to move. What should I do to get the center area like your glass to move?
Lots of thanx
great tutorial
Hey, thank you V much, I’ve spent weeks messing around trying to work photoshop out… Thanks for the helping hand. Im sure I will be re-visiting these pages many times.
i think this is the best type of idea to be done. i figured out the masterpiece of photoshop
thanks a lot man!!u made it very clear…..!!once again thank you very much!!!
thanks a lot man!!!u made it very clear!!once again thanks a lot!!!
Thanks for the help with layer masks. The documentation and help in books is vague and seldomly addresses your needs. You hit the nail on the head!
YOOOOOOOOOOOOOOOOOOO!!!!!!!!!!!
Thanx for the help my friend!!!!!!!!!!!!
Great job, thank you, help me a lot
Thanks for this tutorial.
Finally, I had to learn about masks in Photoshop and here your helpful self is.
Cheers
Eric
http://www.learneasyguitar.com
ps
It helped that you were No2 in google on this keyword phrase: simple mask in photoshop
Great Work !! Excellent Tutorial !!
I have Photoshop Elements 2.0. What version I need to buy to learn masking in Photoshop ? Thanks.
i have photoshop and i’m learning but how do you get the paintbrush
and when i do it doesn’t erase it all the way
im very confused
cs2 photoshop
awesome..job…
i m a beginner…n i have learnt alot 4m this tutorial…
u ppl rockssss,…..:)
hiyaa:L
wits this fur lol 🙂
Thanks that was very helpful and it worked will keep looking
Pingback: Selective Colouring - Page 2 - MINI2
I have read many tutorials on layer mask, and your tutorial is the only one help me to understand the concept. In particular, I like your introduction, provided example, and the detailed description of what we should do next (see below). You did a very good job indeed. A BIG clap and thank you to you.
We want just the glass visible so we need to get rid of the background of the glass image.
We also don’t want all of the stem of the glass visible because we want to give the illusion that the glass is sitting behind the rocks.
We also want part of the top of the glass transparent because we want the viewer to see through it.
I’m using Photoshop CS3 Extended Trial version. First, I was not able to produce two separate windows from which to drag and drop the martini glass layer so I copied it in from File/Open Recent and pasted into the Layer 2.
Then, using the brush tool followed exactly the instruction to hide all but the upper part of the martini glass. The only change was the look of the black paintbrush on the martini glass layer.
What did I do wrong?
thank you so much for this easy to understand and follow tutorial.
Pingback: Customized Design Solutions
Pingback: Cool Myspace Layouts
help!
Hello, iv been using photo shop for ages but dont really no many tricks. i use it to render design concepts at uni. I put sketch’s in and then render as life like as possible. i need to kno how to use layer masks to reveal only certain colours. is this possible? i want to work with with colour underneath an outline sketch with only the back pencil lines showing. Any one who knos please email me at n0027687@ntu.ac.uk.
Pingback: Fade Effect Lebih Kemas Dengan Photoshop | AzmanZainal.com
Pingback: High School Photo Club: Photoshop Retouching « clique
Many thanks…
Excellent! Thanks Bud for ur hard work…
Best greetz from Sweden…
nice tutorials
Really usefull tutorial, made simple and more informative.
looking for tutorials on other tools…keep posting 🙂
applause for your creativity 😉
Thanks,
Sribuz.
Were is the PAINTBRUSH?
Useful, clean and detailed tutorial. Thank you very much.
Great tutorial,
I’m trying to complete the layering but photoshop keeps freezing up and crashing on me. Am I doing it to quickly ?
great tutorial. Simple and to the point. You hit it right on the nail… I have been using PS for a while but never used this feature.
Thanks!!!!
Oh… can’t resize the image once I move it… why is that?
great job — thanks
You did a great job explaining this — you mentioned key points that others l’ve read left out. You have a gift at explaining things. Thanks very much!
Pingback: I’ve learnt: Photoshop layer mask!
Wow, in plain English too! Thank you so much, it was actually easy!
fantastic tutorial, i found it very easy to follow.
Thank you!!!!
Jan, Australia
Thank you! 😀
Thank you so much, that was very helpful and intelligently written (a miracle nowadays, at least on the web!)
A couple of questions I hope don’t sound too ridiculous…first, when you save your new masked layered image, does it become a single image or are the layers still available for editing? Second, I have a little trouble with a layer vs. the background image. Please tell me if I am understanding this correctly:
You are saying that the mask covers up (like a real mask), yet when you paint on the masked layer you are actually revealing the image below. Do you mean to say that the Background is acting as the ‘mask’? And if so, why does it matter which color you choose to paint with? Again, I’m a total beginner so I hope I don’t sound too clueless.
Thank you so much! 🙂
thank you very much
thank you
Thanks for the great tutorial – finally I can understand layer masks and their uses – Hoorah!
Great teaching technique! I am going to look for more of your tutorials.
Thanks for this simple but very helpful article.
Your layer mask instructions were perfect. I’ve even used the Classroom-In-A-Book and found your post to be extra helpful. Much thanks.
I used this technique to create the banners of my webiste. Check tehm out at http://www.ThirdLawBJJ.com
many thanx for the comprehensive lesson n willingness to explain!!! stay safe n in good health!
thanks a million you made it very simple to understand
how can i divide raindrops from background by useing mask in photoshop.
really vry hlpful… thnk u somuch….
HEY! THANX MAN! THIS WORKS KOOO!
Brilliant – so well written & easy to follow – THANK YOU!!
Nice blog right here! Additionally your website rather a lot up
very fast! What web host are you using? Can I am getting your associate hyperlink to your host?
I desire my site loaded up as fast as yours lol
Wonderful blog! I found it while surfing around on Yahoo News.
Do you have any tips on how to get listed in Yahoo News? I’ve been trying for a while but I never seem to get there! Appreciate it
Ahaa, its nice dialogue about this post here at this web site, I
have read all that, so at this time me also commenting at this place.
Hey I know this is off topic but I was wondering if you knew of any widgets I could add to my blog that automatically tweet my newest twitter
updates. I’ve been looking for a plug-in like this for quite some time and was hoping maybe you would have some experience with something like this. Please let me know if you run into anything. I truly enjoy reading your blog and I look forward to your new updates.
thanx man this is great…its so easy to follow your tutorials…i hope to see more cos am now learning photoshop..
When I select “New Layer” my second image disappears into a little box & doesn’t show up on the background I want to apply it to. I can’t figure out how to apply it. I’d appreciate if someone could assist me. THANX! 🙂
Valuable info. Lucky me I discovered your site accidentally, and I’m stunned why this coincidence didn’t happened earlier!
I bookmarked it.
I’ve to convey my respect for your kindness for all those that require guidance on this 1 field. Your special commitment to passing the remedy up and down has been incredibly functional and has continually empowered a lot of people just like me to attain their dreams. Your wonderful insightful information entails a lot to me and particularly to my peers. Thanks a ton; from all of us.
Hey! Someone in my Facebook group shared this site with us so I came to check it out.
I’m definitely loving the information. I’m book-marking and will be tweeting this to
my followers! Superb blog and wonderful style and design.
My site … Immigration Adviser in Tottenham
Can I just say what a relief to discover somebody that actually knows what they are talking about on the internet.
You actually know how to bring an issue to light and make it important.
A lot more people have to look at this and understand this side
of your story. I can’t believe you are not more popular because you certainly have the gift.
Hello there! Would you mind if I share your blog with my facebook group?
There’s a lot of folks that I think would really enjoy your content. Please let me know. Many thanks
быстрое похудение просто сенсация
как похудеть без персональных диет
сисьтемная диета
градиет техно
видео айробика как похудеть
[url=http://serdeleevaja-dieta.slender-xm.ru/]Серделеевая диета[/url]
[url=http://diety1-za-odnu-nedelju-sbrositb1-10-kg.slender-xm.ru/]Диеты за одну неделю сбросить 10 кг[/url]
[url=http://programa-trenirovo-dlja-pohudenija.slender-xm.ru/]Програма тренирово для похудения[/url]
кофейно белковая диета результат
интервью с басковым о похудении
похудеть и сэкономить
[url=http://bodifitnes-uprazhnenija-dlja-goleni.slender-xm.ru/]Бодифитнес упражнения для голени[/url]
домашний фитнес 2012 видео
толстые ляжки диета
рецепт эффективных диет
[url=http://pravilb1no-hoditb1-chtoby1-pohudetb1.slender-xm.ru/]Правильно ходить чтобы похудеть[/url]
[url=http://recepty1-dieticheskie-bljuda-foto.slender-xm.ru/]Рецепты диетические блюда фото[/url]
Hey! I know this is kind of off topic but I was wondering which blog platform are you using for this site?
I’m getting fed up of WordPress because I’ve had problems with hackers and I’m looking at alternatives for another platform. I would be great if you could point me in the direction of a good platform.
Yes! Finally someone writes about widen.
Great post. I will be going through some of these issues
as well..
There is certainly a great deal to know about this subject.
I love all of the points you have made.
Thanks. What a quick and nice explanation 🙂
You should take part in a contest for one of the highest quality
blogs online. I most certainly will highly recommend this
blog!
Whether enjoying a little league, high school, college or major league baseball game, fans should
remember these important items before leaving for the ballpark.
Once decided on the things to bring, start packing.
s r CMOS sensor, BIONZ impression processor chip
in addition to a Sony Grams contact with powerful (10x optical move, 25-250 mm range) wide-angel mega-zoom (26 mm) help in choosing stunning golf swings quite possibly with
low-light circumstances.
Hello there! Do you know if they make any plugins to help with Search Engine Optimization?
I’m trying to get my blog to rank for some targeted keywords but I’m not seeing very good gains.
If you know of any please share. Many thanks!
Howdy, i read your blog occasionally and i own a similar one and i was
just curious if you get a lot of spam comments? If so how do you protect
against it, any plugin or anything you can advise?
I get so much lately it’s driving me crazy so any support is very much appreciated.
I hardly comment, but i did some searching and wound up here Layer
Masks | Photoshop Tips. And I do have a couple of questions
for you if it’s allright. Is it only me or does it look as if like some of the responses appear like left by brain dead people? 😛 And, if you are posting at additional sites, I would like to follow everything fresh you have to post. Could you list of the complete urls of all your public sites like your linkedin profile, Facebook page or twitter feed?
I all the time emailed this web site post page to all
my friends, since if like to read it after that my contacts will too.
My page – usuwanie z bik
An outstanding share! I’ve just forwarded this onto a colleague who had been doing a little research on this. And he in fact ordered me breakfast because I discovered it for him… lol. So allow me to reword this…. Thank YOU for the meal!! But yeah, thanx for spending time to discuss this matter here on your web page.
It’s truly very complicated in this full of activity life to listen news on TV, so I just use world wide web for that reason, and obtain the hottest information.
Pingback: layer mask tutorial photoshop elements 8 | PDF Finder
Pingback: Photoshop Elements Keeps Freezing | Wallpapers