Layer Masks

This tutorial is for people who are just starting out Photoshop or for the people who have been using Photoshop but don’t know how to use Layer Masks.

The basics of Layer masks are incredibly simple but very powerful.

As always we’ll go over a simple tutorial that will quickly teach you how to use Layer Mask Basics. I think that actually doing something is the best way to learn. At least doing some thing is much, much better than just reading about it 😀

First, a tiny intro:

What happens when someone wears a mask?

ladywithmask

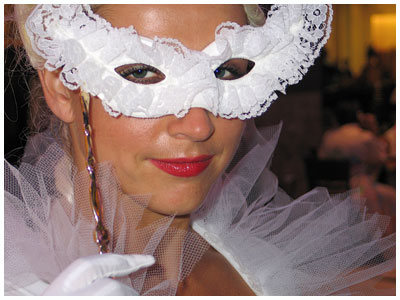
Dumb Question, yeah? It’s obvious that everything behind the mask is not visible and everything else is visible. That’s basically how Layer masks work except that you choose where the mask is and how opaque it is. Simple huh? So let’s follow a quick tutorial.

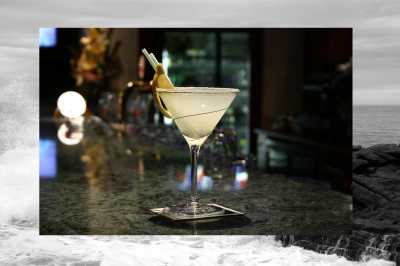
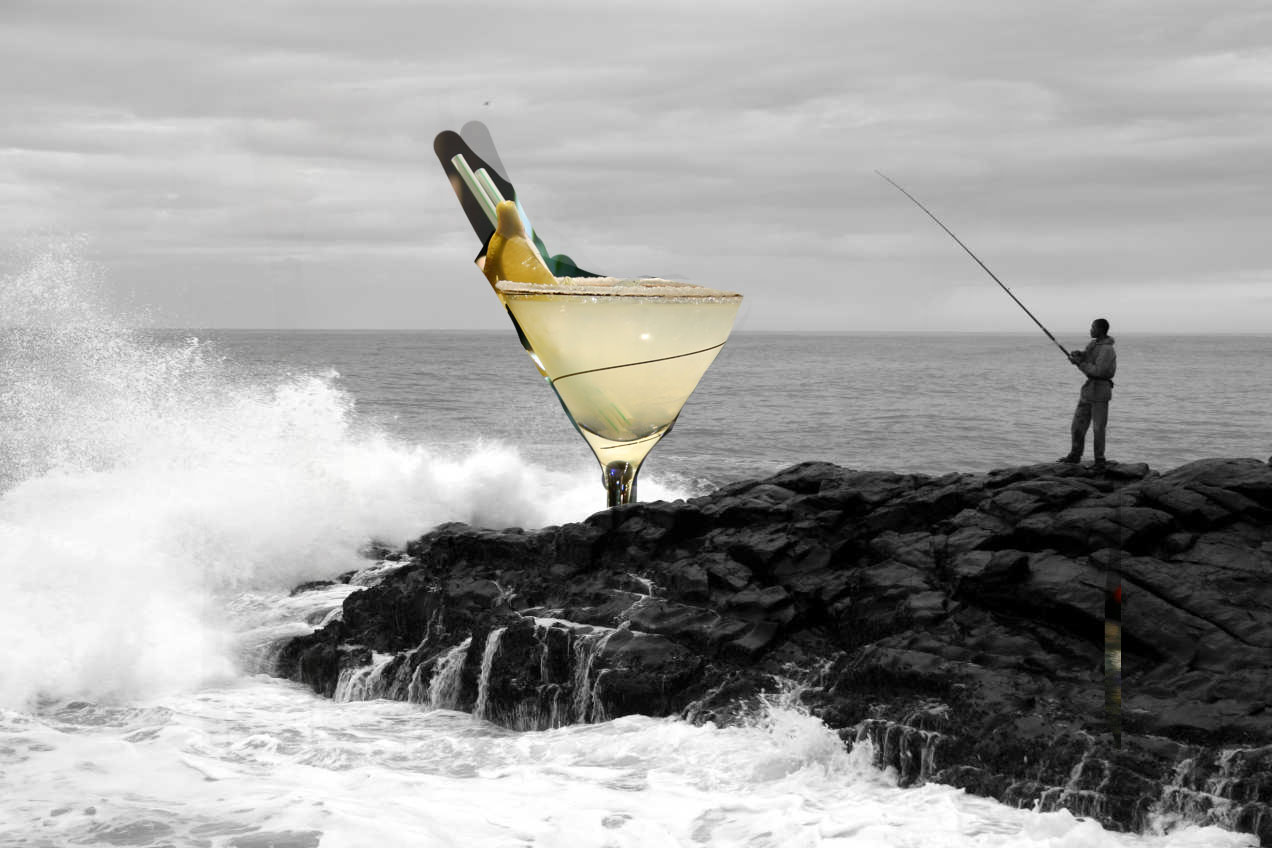
The Final Result of the tutorial is:

layermasked

Yeah, so it’s a glass that is behind some rocks but in front of the ocean. Notice that the glass is partially transparent and you can see the ocean from inside it but the straw, slice of lemon and the stem of the glass are opaque. And yeah… I know the image isn’t going to win any awards but it’s great for explaining Layer masks 😀

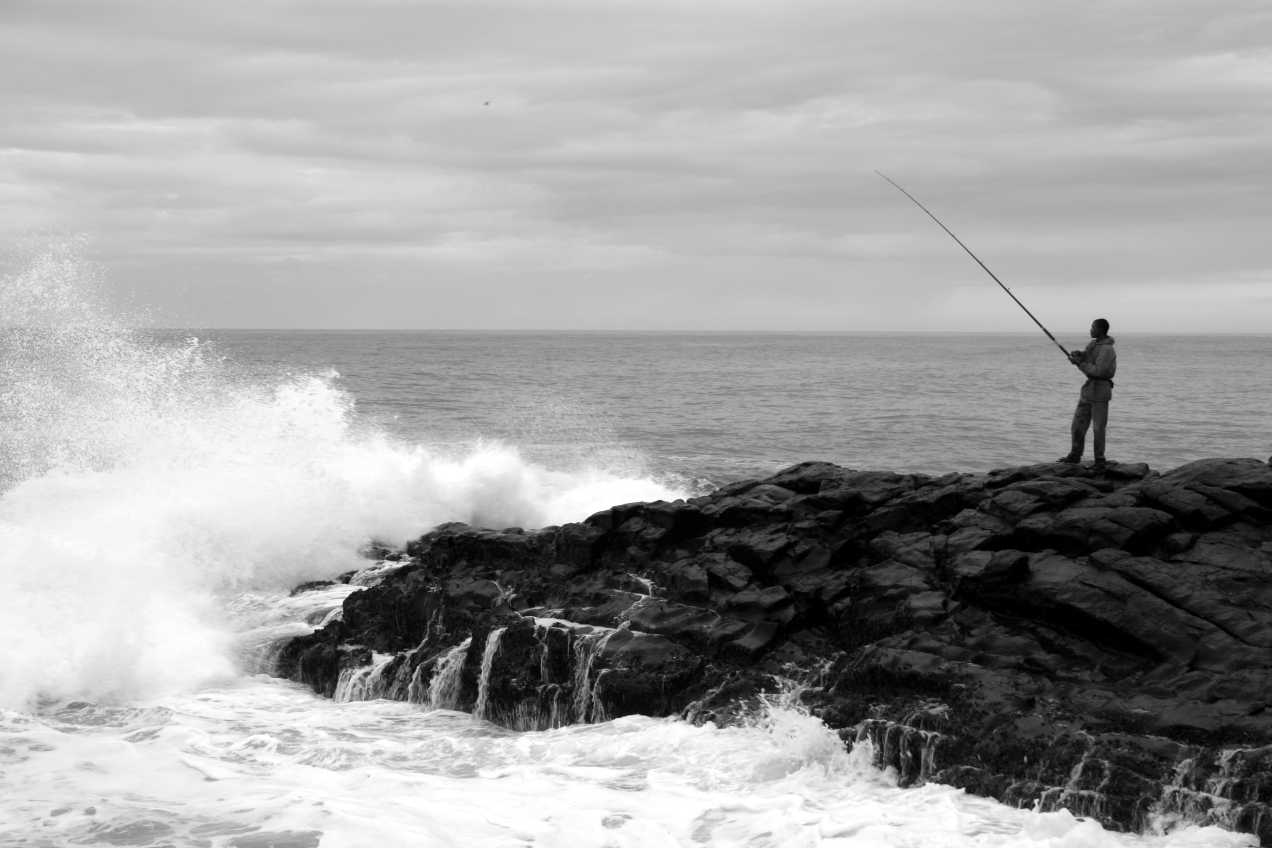
Step 1: Find two images that you want to combine. Here are the images I used:

169820_9687

246635_9583

Step 2: Open both the images in Photoshop. Then, choose the Arrow / Move Tool. Click on the glass image and drag it over to the image with the guy fishing. You can resize the glass so that it’s not too big or you can leave it the way it is. Your choice. Click here for a short flash video of this step if you are having trouble moving the glass image on top of the ocean image.
step2

Step 3: Choose the layer with the glass and then click on the Layer Mask button. It’s the rectangle with the circle in it.

step3a

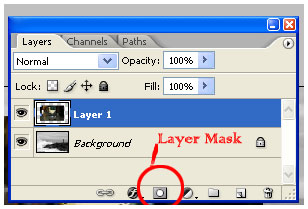
After clicking you’ll see something like this:

step3b

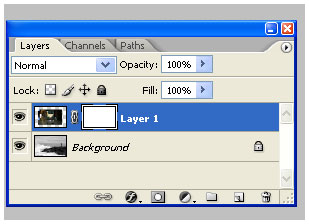
There it is! The layer mask. Currently it is set to reveal all of the image, meaning that the mask is off and nothing is hidden (since it is revealing everything!)

Now we actually use the mask. First let’s think of what we’re trying to do.

  • We want just the glass visible so we need to get rid of the background of the glass image.
  • We also don’t want all of the stem of the glass visible because we want to give the illusion that the glass is sitting behind the rocks.
  • We also want part of the top of the glass transparent because we want the viewer to see through it.

If we used just layers and opacity of layers to accomplish this then we’d end up cutting up glass in lots of portions and messing with the opacity and it would be tedious and really, really annoying and would take a long time. That is why we’ll use the layer mask!

Hmm, you’ll also notice that when you click on the layer mask your colors in the color picker turn to black and white. So here it is… the secret of Layer masks: Depending on what the settings are, the color WHITE shows or reveals the image AND the color BLACK hides or masks the image (We’re talking about the image on which the layer mask is applied, not the layer below it). So on to step 4…

Step 4: Grab your PAINTBRUSH. Choose BLACK and start wildly painting. Paint over the stem so it looks like the rocks are infront. Paint over the background of the glass image. Keep on painting until you only have the glass. Now what if you make a mistake and hide part of the glass? No problem. Layer masks are not destructive so just change the color to WHITE and paint over the glass and it’ll magically reappear. You can basically adjust the brush size, or the shade of
gray and you get way more control than using destructive methods. If you use an eraser you can’t easily undo something you did 20 steps before etc etc.

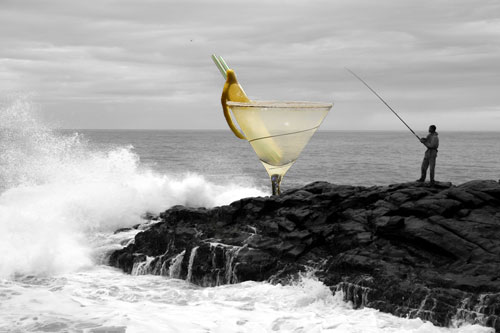
So here is my version of this step:

stepwhat

I’m not worried about being perfect because nothing is being deleted. It’s all there. Just hit the “X” key on your keyboard and you’ll quickly switch between black and white and you can fix your mistakes. Now after you have quickly erased everything that is not needed just zoom waaay in and with a small brush just fix up the edges so they look good. Be sure to get that area in between that lemon slice 😀 .

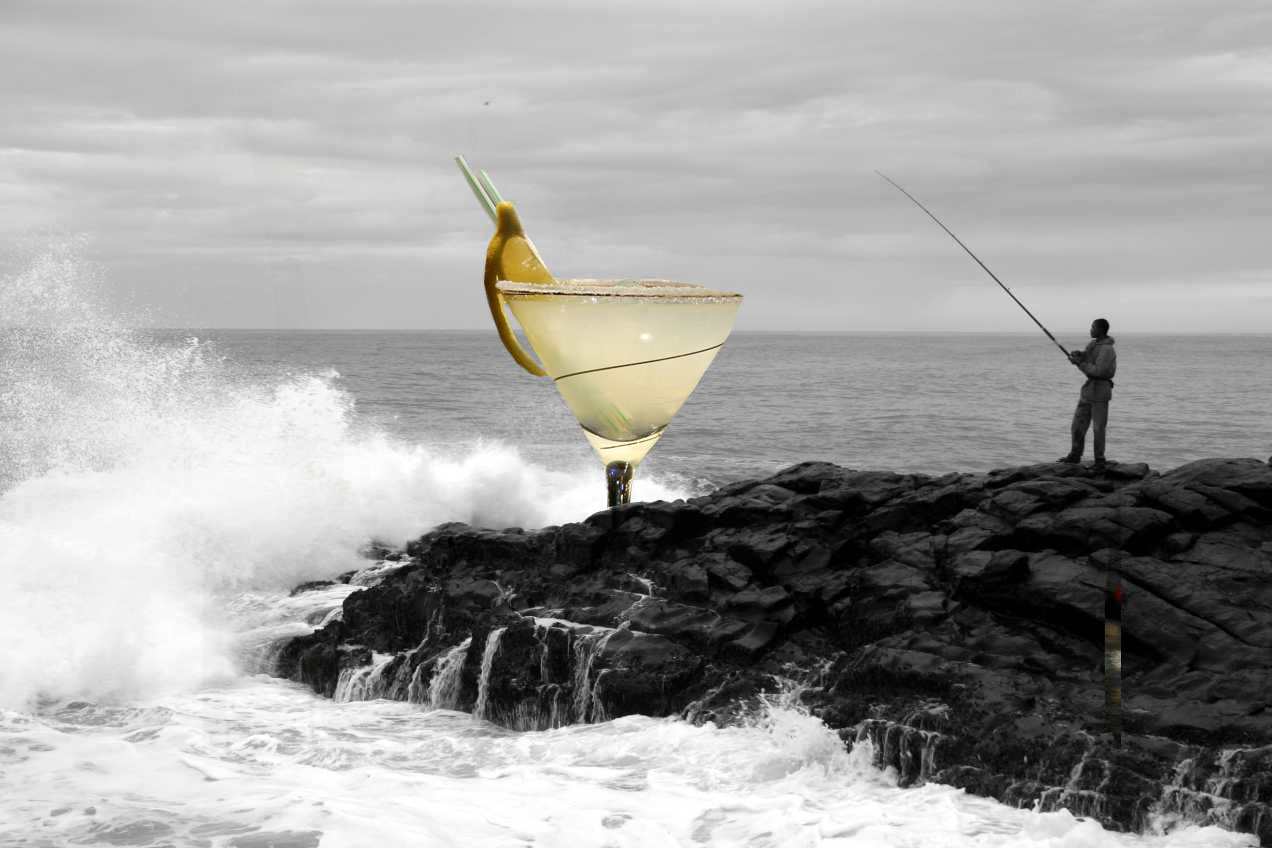
So now I have something like this:

step4b

Step 5: Finally, we need to make the glass a bit transparent. You can do two things. You can a) Set the opacity of the brush to 50% and then paint right over the glass or b) You can change the color of your brush to gray and then paint over the areas you want to make transparent. Using the current settings (i.e White reveals) then if you make your brush dark gray then your glass will be less opaque and more transparent. If you choose light gray then your glass will appear less transparent. Just
paint it gray in the areas where you want it to appear slightly transparent but not in the areas with the lemon slice and straws. If you can’t make the transparent area look smooth (ie. you can see the brush strokes) then just grab the smudge tool and lightly smudge the gray area until it looks good and smooth. You can use any filter or tool on the layer mask and it’ll give you a new sort of effect :D.

That is all. You have the final image:

layermasked

I hope I was able to show you how layer masks can make your life easier. This is obviously not the only thing you can do with layer masks so keep playing with this and learn more. If you have any questions then leave me comments below and I’ll try my best to get back to you in a timely fashion.

Notes:

  • Layer Masks are one of the easiest features of Photoshop to understand. A Layer mask is just what it sounds like: a mask that goes on a layer. Think of what happens when a person wears a mask. You can see through the holes but not through the mask itself. It’s a great way to non-destructively hide parts of a layer. You will not lose any data and to go back to the original state you’ll just delete the mask.
  • You can go to Layer > Layer Masks > Reveal All or Hide All to apply the mask (also you can just choose the rectangle with the circle from the Layers window.)
  • Use the “X” key to quickly switch between Black and White (to show and hide)
  • Shades of Gray in a layer mask change the opacity of the layer.
  • A link icon appears in the middle of the layer and the layer mask. If it is linked then both the mask and layer can be moved together. If it is unlinked then you can independently move the layer and its mask.
  • Be sure to click the Layer mask rectangle in the layer window when working with layer masks.
  • Commonly, layer masks are used with Text and Gradients so experiment with those.
  • I’ll continue updating this page with more tutorials and examples if I can think of any 😀
  • Comments, Critiques and suggestions are always welcome.

Smart Sharpen

Smart Sharpen

A new feature of Photoshop CS2 is the Smart Sharpen tool. This tool provides photographers with even more control over their photographs. Unfortunately, this tool is not available in previous versions of Adobe Photoshop, therefore, only users who have upgraded to Photoshop CS2 will be able to benefit from this tutorial. This is the first change in the Filter>Sharpen menu in 14 years! ( Learn about Sharpening Basics by clicking here for part 1 of this series )

NOTE: You can click on all the images to increase their size! 😀

The Smart Sharpen tool can be found by going to the Filter Menu Item and then going in to the Sharpen Menu.

Filter > Sharpen > Smart Sharpen.

ssharpenlocation.png

You will now see a window called “Smart Sharpen”. This window has an option to choose from Basic and Advanced modes. Below that you will see a Settings drop down menu. This settings drop down menu allows you to save the current settings so you can easily get to them later.Below that you will see Amount and Radius.

So far everything is very similar to the Unsharp Mask tool. The difference will now be apparent because of the Remove options. The Remove Drop down menu has three options. These allow you to remove Gaussian Blur, Lens Blur and Motion Blur. Each option triggers a different algorithm that Photoshop uses to remove these specific types of blurs. Finally, if you choose the Advanced Radio button you will be able to see three tabs: Sharpen, Highlights and Shadows. These allow the user to set the sharpness of the midtones, highlights and shadows. This is useful because sometimes you don’t want the shadows to be as sharp as the highlights (or vice versa) .

ssharpenimage.png

Let’s go over each option available to us:

The Remove Options

removeoptions.png


These options allow us to remove blurs caused by the three common types of blurs: Gaussian, Lens and Motion blurs.

Removing Gaussian Blur

The Gaussian Blur is very similar to viewing an image from an out-of-focus lens. If your image has a consistent soft blur with no areas of sharpness then this is the option to use. If the image you are working on is slightly out of focus then applying the Gaussian Blur Removal option will fix that problem. This is very similar to our regular unsharp masking technique. Nothing new here.

gaussiana.png
(gaussian blur)gaussianb.png
(after smart sharpen: remove gaussian blur)

Removing Lens Blur

A lens blur is similar to Gaussian blur but a little different because it is not as soft. The Lens Blur Removal option removes the lens blur while finding edges and not creating obvious halos. This is also useful for images with finer details.

lensblura.png
(lens blur)
lensblurb.png
(after smart sharpen: remove lens blur)

Removing Motion Blur

A motion blur happen when the camera or the subject moves or the camera shutter is open for too long. A faint trail of the subject is formed and there is little sharpness to the image. After choosing the Motion Blur removal option you will see that you are given the option to choose the angle. Just choose the angle that is as close as possible to the direction of the motion blur. The more accurate you are with the angle the better the motion blur will be fixed.

The Motion Blur Removal option works best if the motion blur happens only in one direction. Sometimes the camera may move in many directions and if that happens then the result of this tool is not very great but you can try applying two remove-motion-blur smart sharpens one after the other for each angle in which the motion blur exists.

motiona.png
(motion blur)motionb.png
(after smart sharpen: remove motion blur)

Advanced Mode

There are times when you might want only some parts of an image sharpened while leaving the rest untouched. There may be times when you want to sharpen parts of an image more than other parts. Put your selection tools back because you probably won’t need them because the smart sharpen tool will take care of everything.

Clicking on the Advanced radio button will bring up three tabs called Sharpen, Shadow and Highlight. The Shadow and Highlight tabs have three sliders called Fade Amount, Tonal Width and Radius.

advancedshadows.png

The main advantage of the Advanced mode of the Sharpen tool is that it allows us to set the sharpness of Midtones, Shadows and Highlights individually. Mainly we’ll be controlling what gets sharpened LESS.

  • The Fade Amount controls the strength of the sharpening in either areas that are considered shadows or highlights (depending on which tab you are currently in). If you increase the fade amount of shadows then the dark areas of your image will not be as sharp. If you increase the fade amount of highlights then the light areas will not be as sharp. The higher this setting, the more the sharpness decreases. The lower this setting, the more the sharpness increases.

Here is a demonstration of Fade Amount:

1. Let’s take a look at this Arch thingamajig:

archway.png

2. I’m going to zoom in to one of the shadows and INCREASE the fade amount to 100%

fadeexamplea.png

3. Next, I’m going to DECREASE the fade amount to 0%

fadeexampleb.png

4. Did you notice the sharpness of the shadows? When the fade amount of the shadows is 100% then the shadows don’t get sharpened. When you decrease the fade amount to 0% then all the shadows get the full sharpness treatment! Pretty neat!

  • The Tonal Width controls which tonal values will be affected by the reduction in sharpness. The tonal width is defined as the difference between the lightest part of the image and the darkest part of the image. The Tonal Width slider determines which tonal values will be sharpened (or not sharpened). If the value of the Tonal Width slider is small then only lightest highlights or darkest shadows (depending on whether you are in the highlights or shadows tab) will be affected by the sharpening reduction. If the value of the Tonal width slider is great then a greater range or highlights or shadows will be affected by the sharpening reduction.

Here is an example:

1. We’ll take the same image again. First I’m going to set the fade amount to 100% (Recall that increasing the fade amount decreases the sharpness). Then I’m going to change the tonal width to 0%. You’ll notice that everything is sharpened despite the fact that the fade amount is 100%. The reason for that is that the Tonal width controls where the sharpness DECREASES. So when you change the tonal width to 0% then the sharpness does not decrease anywhere.

tonalexamplea.png

2. Now I will increase the Tonal width to 100% and the sharpeness gets reduced all over the image.

tonalexampleb.png

The Radius slider determines which areas are to be considered shadows or highlights. This basically controls the size of the area around each pixel that is used to determine whether a pixel is a shadow or a highlight. A small radius means that small patches of darks and lights will be considered shadows or highlights. A large radius means that large patches of darks and lights will be considered to be shadows or highlights.

Let’s Smart Sharpen an image (Click the images to enlarge) :

1. I’m going to choose the first image I get from http://www.sxc.hu

exampleA.png

2. Open up the Smart Sharpen Tool (Filter>Sharpen>Smart Sharpen). Choose the advanced radio button and make sure all the settings in Shadows and Highlights tab are set to zero.

exampleB.png

3. Go back to the sharpen tab and adjust the settings mainly to get a good sharp edge. I used the following settings:

exampleC.png

4. Now go to the shadows tab. Now we will increase these settings so we can remove as much noise from the shadows as possible. I zoomed into an area with lots of shadow. I used the following settings and it seemed to rid the noise quite well with out loosing sharpness.

exampleD.png

5. Finally I went to the highlights tab and removed as much noise as I could from highlights. I also made sure that the image did retain some softness (your preference).

exampleE.png

6. The final image and the initial image has subtle differences and most of the time these subtle differences are what really matter.

Here is another example of sharpness correction:

beforeglass.png
(before)

afterglass.png
(after)

I hope you found this tutorial helpful. There are even more sharpness techniques that I will cover in the near future. At this time I feel like creating my next tutorial about something other than sharpness 😀 Thanks for readings. Comments are encouraged.

Technorati : , , ,
Del.icio.us : , , ,

The Art of Creative Thinking

Julieanne Kost has posted 18 Steps to effective creative thinking. The excerpt is from her book called Window Seat.

0596100833.01.MZZZZZZZ.jpg

If you are feeling a bit uncreative then by all means read Julieannes advice by [ clicking here ]

From the article:

2. Listen to what your life is trying to tell you.

9. Take 15 minutes for yourself every day.

14. Keep a Journal

12. Take up an interest in something you know nothing about

This is a must read!

[ Thanks for Creativepro.com ]

Technorati : , ,
Del.icio.us : , ,