This is a simple tutorial that I thought could be useful sometimes. This teaches how to create Fairy dust. It looks slightly similar to Tinker Bells Fairy Dust.
This is the effect that can be achieved (click to enlarge) :

This is a simple tutorial that I thought could be useful sometimes. This teaches how to create Fairy dust. It looks slightly similar to Tinker Bells Fairy Dust.
This is the effect that can be achieved (click to enlarge) :
I enjoyed this tutorial simply because I hadn’t seen anything similar to this in a while. This tutorial teaches how to create a realistic looking shadow using Photoshop. The final result is great so I decided to post it here.
Before:

After:

The result looks very authentic.
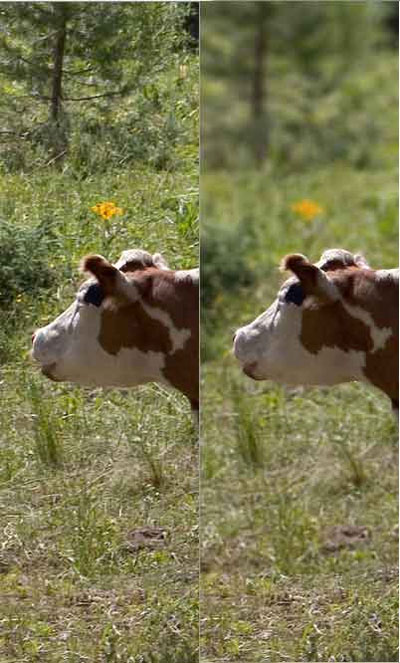
Photoshop Sharpening Tutorial – Part 1
The goal of this tutorial series is to provide the reader will all the information I have about sharpening photographs in Photoshop.
What is Sharpening exactly?
All digital photographs lose a certain amount of sharpness. That means that most photographs will look a bit blurred and their details won’t be as prominent. Basically, sharpening makes the edges of a photographed object appear more distinct.
Why do we need to sharpen?
When a digital photograph is taken the camera converts all the visual data that it receives into lots of 1s and 0s. Basically, what that means is that the camera doesn’t really know what it’s actually “seeing”. It takes all the data available to it and just dumps all the information on to disk with out differentiating between the important stuff and the not so important stuff. For example, if you take a picture of a fly sitting on white marble, the camera will pay as much attention to the white marble as it does to the object of the photograph, the fly.
Sharpening is a way in which the photographer says “hey… this fly needs to have more emphasis and show more detail than the white marble!” The photographer then does some mumbo jumbo until the level of detail and emphasis that he wants on the subject is reached.
What is this mumbo jumbo you speak of?
This is what the remainder of this tutorial will focus on. How does one effectively sharpen an image with out completely ruining it? I will attempt to give you, at least, an over view of all the sharpening tools available to a Photoshop user. I will probably pay more attention to the more important tools.
You might be wondering something along the lines of: “well… there is a sharpen tool and I click on it and I drag it around and it sharpens… what’s so complicated about that?” The answer to that is that there needs to be a fine balance when you sharpen because it’s very easy to kill your images. You might end up sharpening the noise in the photograph and hence end up emphasizing the wrong stuff. So, just bear with me and I’ll try to make this as easy and quick as possible 😀
This is not Adobe Photoshop related but I’m sure many readers will be interested in viewing this painting created using MS Paint.
CreativePro.com has an excellent tutorial on how to create the perception of depth by using Alpha Channels. Here is the effect that is achieved: