If you have ever found your self selecting and then re-selecting the same portion of an image in Photoshop then you are in dire need of Alpha Masks.
Scenario: Imagine that you are working on a Photoshop project where you had to carefully select something. You took about 10 minutes to successfully select something. Then you worked in the selection for another 10 minutes and then you deselected only to realize that you forgot to apply a stroke (Edit > Stroke) to the image. What now? You’ll have to spend another 10 minutes re-selecting. 🙁
The whole re-selecting process could have been avoided if you had used Alpha Channels to save your selection.
Selecting an Alien Flower
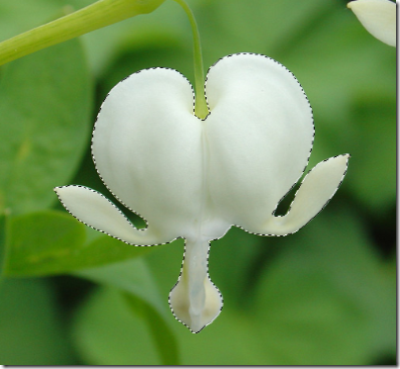
1) Here I have selected what appears to be an alien flower. It took me about five minutes (I selected in Quick Mask mode). I wouldn’t want to spend another 5 minutes re-selecting it in the future.
Saving the Selection For Ever
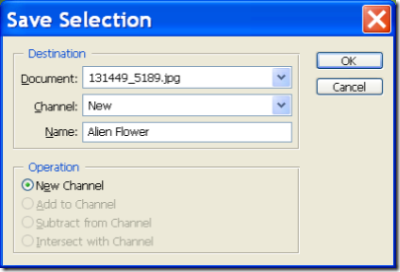
2) So now I want to save this selection. With a stroke of genius, I glide my mouse pointer with extraordinary skill all the way to the Select menu. While in this menu I click on Save Selection. Tada! I have successfully saved the selection. I’ll never have to re-select that alien flower ever again.
If you did the same then you should see something like the following window appear:
Enter a name and click ok.
Wait? What Happened?
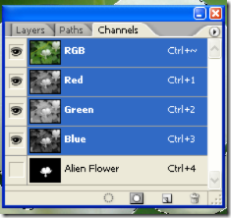
3) Nothing appeared to happen but if you go to your Channels Palette ( Window > Channels ) then you will see an Alpha Channel. This is the saved selection.
Moment of Truth.
4) De-select the current selection ( Press CTRL/CMD+D). Now if you want the selection to come back then just CTRL/CMD+ Click on the new Alpha Channel (called Alien Flower in this example) and your selection will return. Whew!
Not only will this selection re-use allow you to save time but now you have access to a whole new list of channel features.
Some Facts
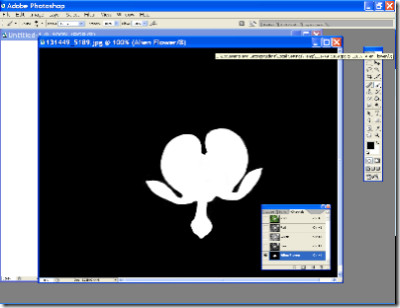
5) If you click on the Alpha Channel, the entire image will turn black and white.
- The areas that are not selected will be black
- The areas that were with in the selection will be white.
- The areas that are translucent or partially transparent will appear as shades of gray.
This view is helpful because you can check if you have errors in your selection. If your selection is fuzzy then you can adjust the levels ( Image > Adjustments > Levels ) or sharpen the selection ( Filter > Sharpen > Smart Sharpen ).
You are allowed to use most of the filters and image adjustment tools in this view. You can use this for your advantage and create lots of fun and useful effects. I’ll try to cover some of these in the days ahead. 😉
You can also use the paint brush, paint bucket, or pencil tool to reshape the selection. If you paint black then that area will get deselected. If you paint white then those areas will get selected. Gray areas will be semi-transparent.
What’s Next?
- Line Art – How to separate the Lines from the Paper
- Spot Colors
- Channel Effects
- and more.
[tags]Channels, Alpha, Tutorial, Tips, Photoshop, Alpha Channels, Howto[/tags]
Please leave a comment 🙂


a nice explanation of channels, something that i struggled with in the past but the tutorial has cleared some things up for me… thanks 🙂
Nicely written and clearly explained.
Thanks!
What you’ve covered is only a tip of the iceberg. There are possibly endless things you can do with your alpha channel like Depth of Field (DOF) , etc.
Very clear for persons new to photo editing and alpha channels.
Hello and thank you! You’ve put together some great tutorials here. They’re really thorough and easy to understand, while teaching a lot. I can’t wait to see more! Thanks again.
Loved the tutorial! Gave a perfect balance of theory and practical. Tried this out myself and it’s a like a new Photoshop revelation to me. Plus the file size is extremely smaller compared to just adding new layers.
One question though, let’s say I’ve saved a selected channel – for example the alien flower above – but then later on I decided to move the original image with the Move tool. Is there a way I can lock the channel (in the Channels palette) to the original image (in the Layers palette) so that they both stay aligned?
Best, J
Cool lesson on channels. I have a problem Saving my work as a JPEG, because some channels dont show up in the finished work :S anyone got suggestions please?
its a bleeding heart plant 🙁
This article writes extremely well, I like very much, later I will be able to come here to have a look,Comes here to support your.
After going through your layer mask, now I have arrived at Channels, I have gone through many many web tutorials for years and never found such an easy made tuition for such complex subjects. Thank you so much. You are super!!